Week 1 – Markdown, URLs and Paths
Lecture Materials
- Monday Lecture Handout (Slides)
- Monday Lecture Handout (PDF)
- Wednesday Lecture Handout (Slides)
- Wednesday Lecture Handout (PDF)
- Monday Notes
- Wednesday Notes
Related Links
- About Git
- Github
- Github Pages
- Github Desktop
- Markdown cheat sheet
- What is Markdown?
- Git (You don't necessarily have to install this on its own for your computer; but this is the link to the underlying tool called
git. It's included in Github Desktop.)
Key Definitions
- git repository: A folder that tracks the history of edits to its files
- Github repository: A git repository online, like a Google Drive folder with history
- Github pages: A service that takes a Github repository and builds a
website from it (usually relying on conventions, like
index.md) - Markdown: A way to write plain text files with a little bit of formatting
- commit: A set of changes to a file or multiple files in a repository. A repository history is made up of commits
- git clone: A git action to copy a repository from one place to another (usually from somewhere like Github to our computer). Copies the contents of the folder and the entire history – the whole repository.
- git commit: A git action to take some changes we've made to files and turn them into a commit in the repository's history
- git push: A git action to send commits from one place to another (usually from our computer to Github)
Lab Tasks
In this lab you'll make a professional website for yourself where you can post
your lab reports for the course. Please contact the instructor
(jpolitz@ucsd.edu) if for
personal privacy or security reasons you do not want to publish a public
website, even under a pseudonym.
Part 1 – Meet Your Group!
We will split into groups of 6-8 students for discussion. For week 1, you may sit wherever you want and choose who you want to work with. Starting week 2, we will have assigned seating and groups. These groups will be somewhat stable throughout the quarter, though some small changes will likely happen. You will have a tutor or TA assigned to your group for help and discussion.
Your discussion leader (the tutor/TA in your lab) will share a Google Doc with your group where you can fill in notes as you work; this document is only for your group. Your discussion leader will not take notes for you.
Write down in notes: In your groups, share, and note in the running notes document (discussion leaders, you answer these as well!):
- How you'd like people to refer to you (pronounce your name/nickname, pronouns like he/her/they, etc)
- Your major
- One of:
- A UCSD student organization you're a member of or interested in
- Your favorite place you've found on campus so far
- A useful campus shortcut or trick you know
- Your answer to the following question. Discuss why you chose that answer.
Part 2 – Your First Workspace
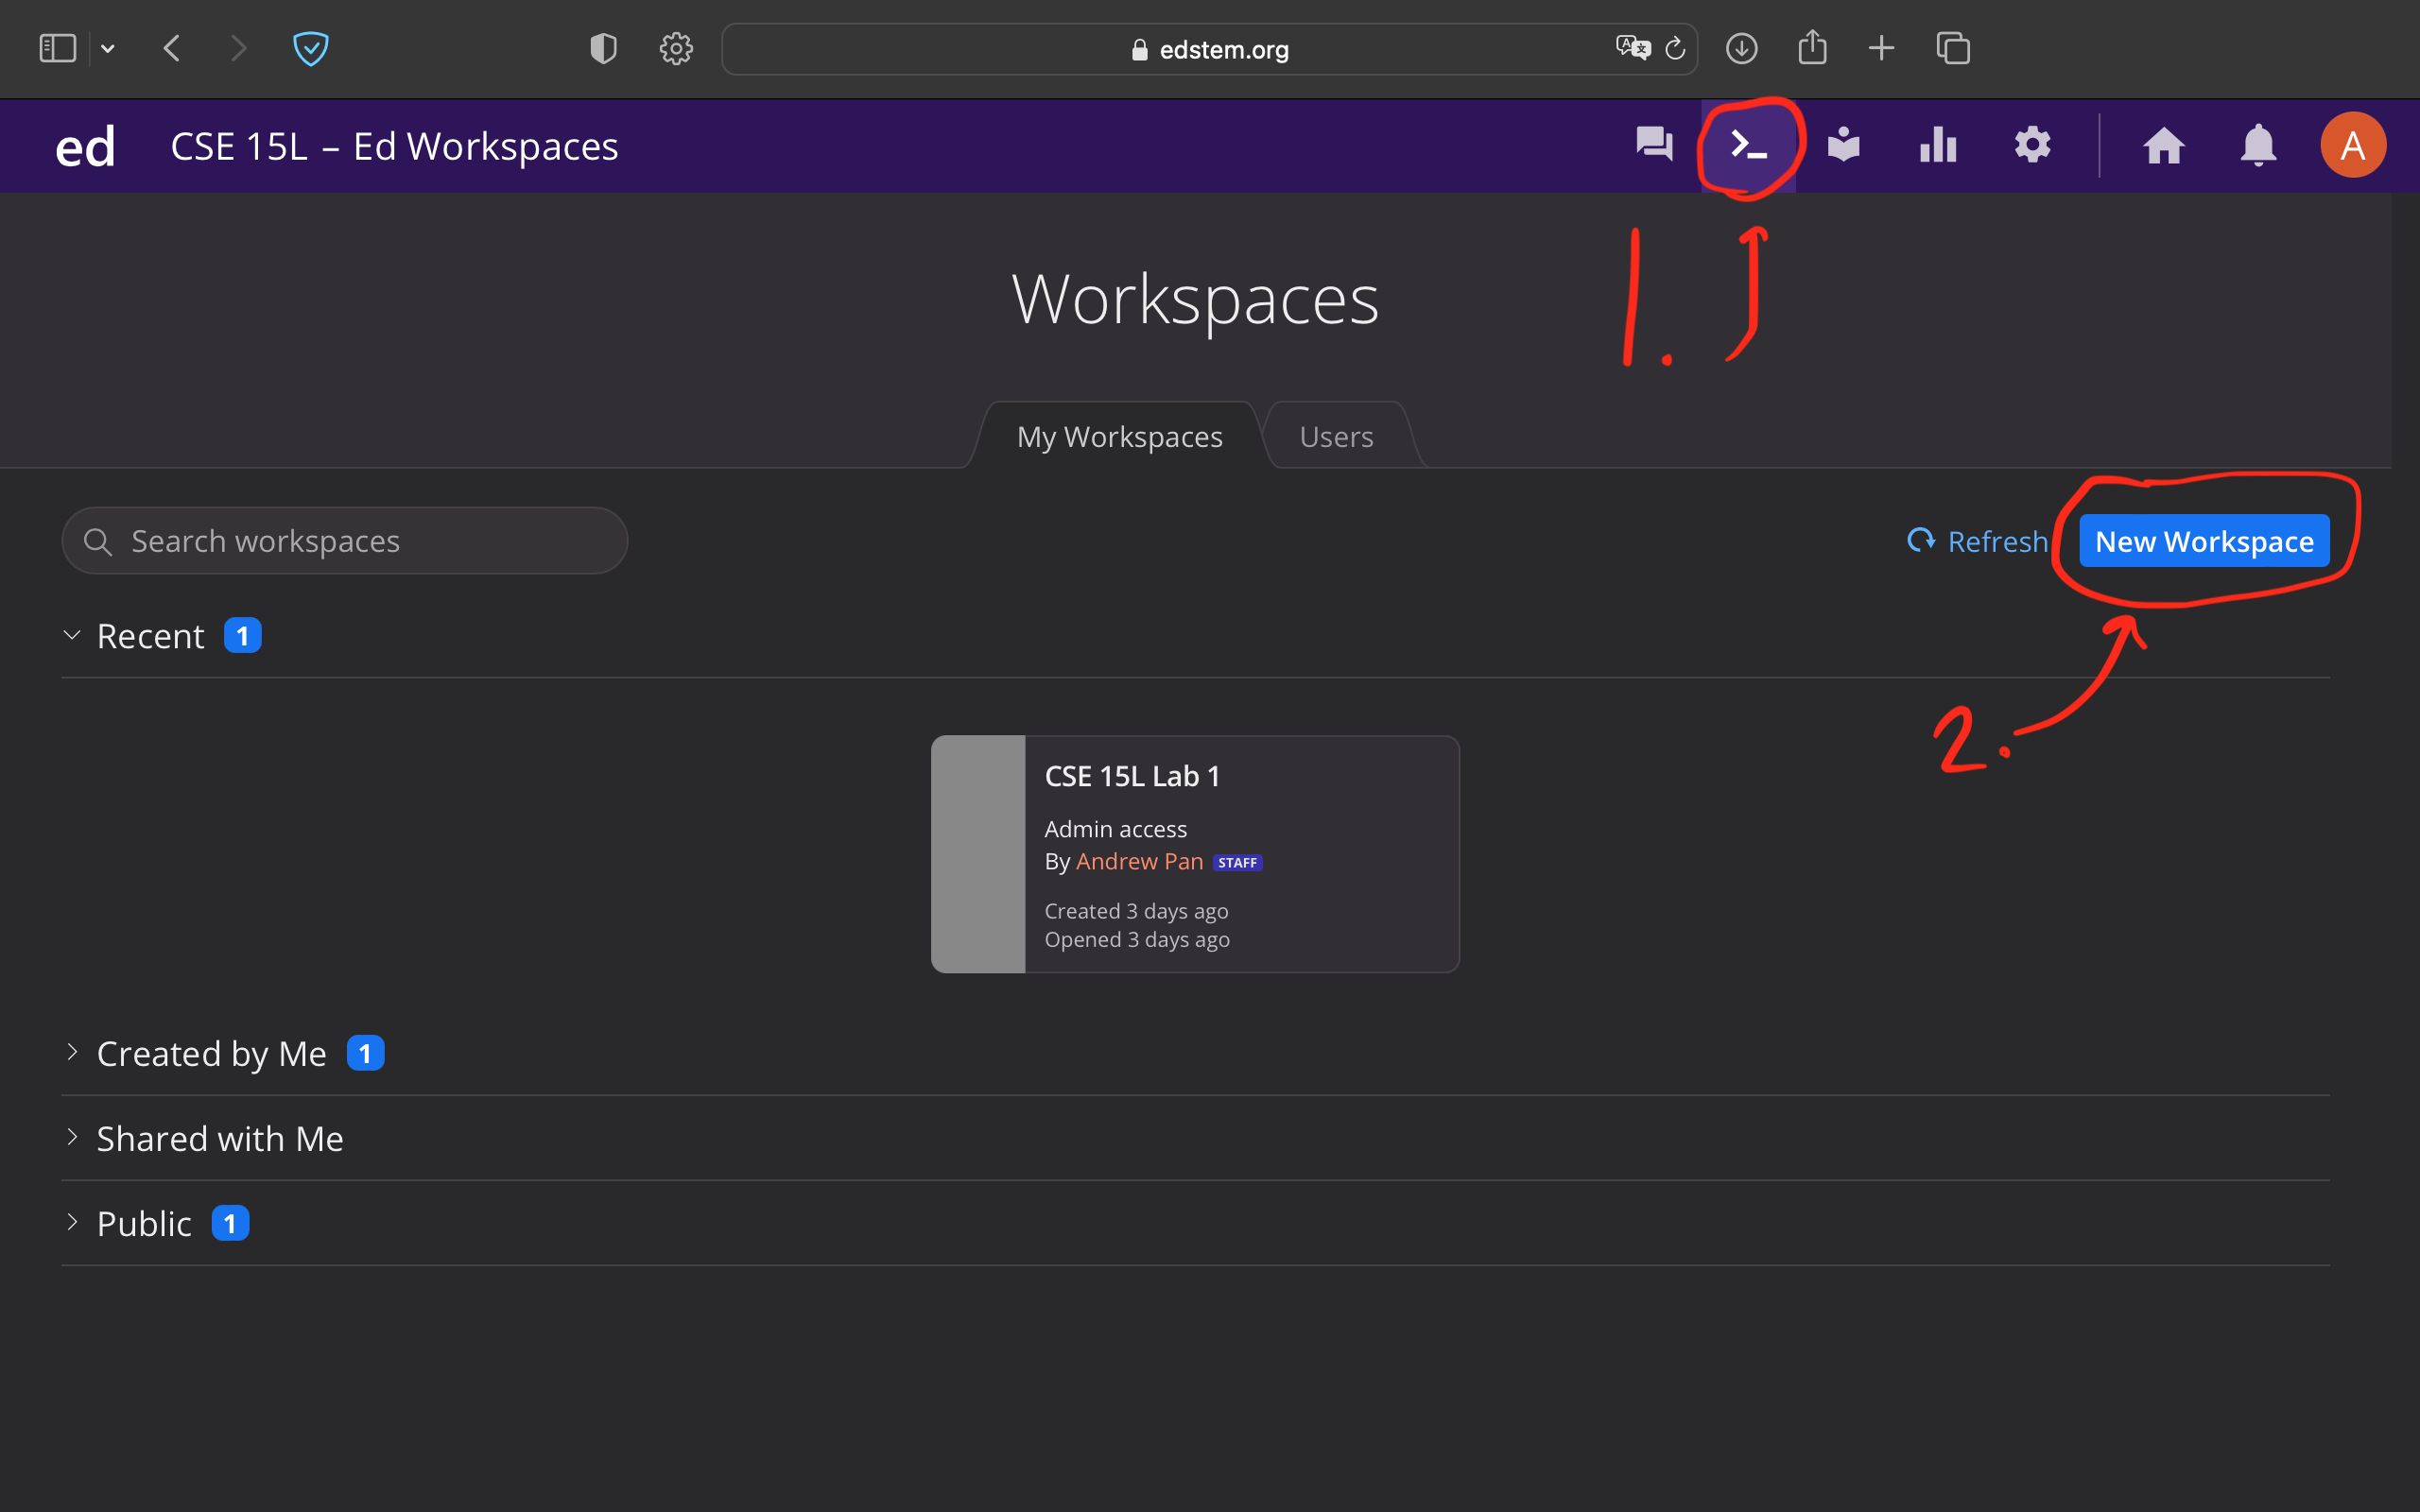
In this part of the lab you'll set up a Workspace, which has a file system and a terminal we can use to write code and run commands. We'll do this on Edstem, but many systems you'll use in the future will have a similar notion of a workspace.
-
Log into Edstem https://edstem.org, and go to the “Workspaces” area, and make a new Workspace (see image below). You can pick the name, but something like “Lab1” is a good idea.
-
Then, let's access the code from class. Open a terminal, and run the following command:
git clone https://github.com/ucsd-cse15l-f23/lecture1To run the command, you can copy it directly from here, paste it into your terminal, and press Enter.
-
Write down in notes/discuss: What happened? Write down everything you noticed happen when you ran that command, and discuss what you saw as a group.
Next, let's make sure we can run the javac and java commands we saw in
class. This will involve running them from the correct working directory.
The git clone command made a folder called lecture1; we'll use the terminal
to change directory into that folder and then run commands there:
-
Run
pwd, this should show a result like/home; you should see this:[user@sahara ~]$ pwd /home -
Then run
cd lecture1. That command produces no output when it works! Try usingpwdagain to see what changed. You should see this:[user@sahara ~]$ cd lecture1 [user@sahara ~/lecture1]$ pwd /home/lecture1We see that we changed directories in two ways. First, the prompt changed – it now says
[user@sahara ~/lecture1]$which is a reminder about which directory the terminal is in. Also, the output ofpwdshows/home/lecture1, which is the new working directory.pwdis a useful tool for checking “where your terminal is”. There are several commands that are good for this kind of status checking,pwdis the first we'll learn. -
Now run
ls; you should see something like this:[user@sahara ~/lecture1]$ ls Hello.java messages READMElsshows the names of the files and folders inside the current working directory. It's another useful status-checking command. -
Finally, let's get to running the
javacommands. First, runjavac:javac Hello.java -
Write down in notes/discuss: What happened? Write down everything you noticed happen when you ran that command, and discuss what you saw as a group. (Hint: did any new files related to Hello.java get created? Can you see them with
lsor in the file browser in the workspace?) -
Next, run this command (feel free to pick any of the three languages!)
java Hello messages/es-mx.txt -
Write down in notes/discuss: What happened? What output do you see? How does the output relate to the code in the
Hello.javafile? -
Add a new language file to
messages(you can pick a language and use the official code by looking at https://www.andiamo.co.uk/resources/iso-language-codes/). It should be called<language-code>.txtin themessagesdirectory, and have “Hello World!” translated into the language you chose. If someone in your group knows the language, they can write it directly, or you could use Google Translate or other similar tools!
Write down in notes: Take a screenshot of running java on your newly-added
language file and include it in your notes.
Part 3 – git, Github, and Github Pages
Having a professional portfolio website for yourself can be useful in many, many ways. It's a useful URL to put at the top of your resume/CV where potential employers can learn more about you. Lots of great work in CS is published only on someone's personal page, or is at least most accessible there. Most CS faculty have such a page (just a few examples from new CSE faculty), for example.
Also, journaling and logging what you've learned is a powerful tool. Writing down what we've done and how we've done it, for an audience (real or imagined) other than ourselves, forces us to confront lingering misconceptions and cements what we learned in our memories. It's also simply useful to refresh your memory later!
For these reasons, we'll spend the rest of this lab creating a personal page, and then learning to write a blog post about what we learned.
Github (https://www.github.com) is a web service for storing and
sharing code, along with a huge number of services surrounding that code. It
uses a tool and protocol called git https://git-scm.com/ to store and
retrieve that code. Github Pages
https://pages.github.com/ is one of the services
Github provides for publishing personal and project websites from your Github
account.
This lab is a basic introduction to all of these. We will learn to use them in more detail as the quarter goes on; learning all that git, Github, or Github Pages has to offer could take months of practice!
Part 4 – Creating a Website with Github Pages
This section will show you how to create a site with Github Pages that you'll use for your lab reports.
There are written instructions with screenshots below you can follow, and also a video:
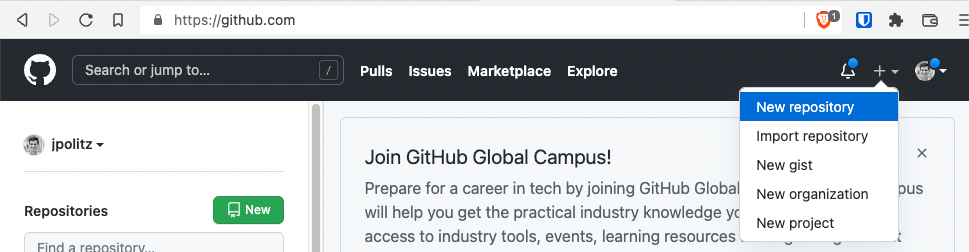
Make a Github Account
Go to https://www.github.com and create an account:

(If you already have an account, you choose if you want to use it or create a new one for this course).
You can choose any username you like for the account; it doesn't have to be related to your legal or preferred name, though it can be and often is. Some people choose names related to their name, like me (my Github account is jpolitz). Others choose more abstract or whimsical names for their accounts, just like usernames on any other service. Feel free to do whatever feels right to you, and in any event, you can always change it later.
Create a Repository
Once you've created your account, we are going to create a new repository on Github. A repository is a folder or directory with an associated history of changes that were made to the files within it. In this sense, a repository on Github has some similarities to a folder in Google Drive; the differences are mainly in the level of control we get in managing that history of changes.
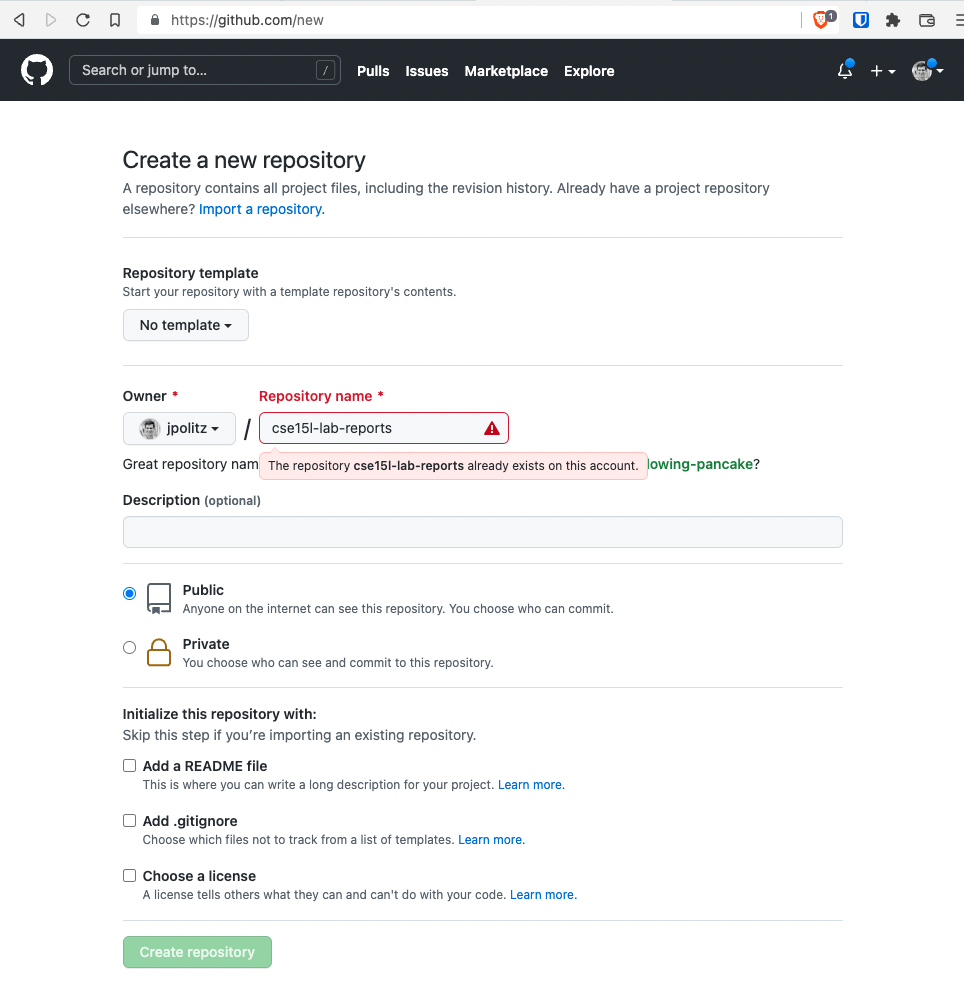
Name the repository cse15l-lab-reports (in my screenshot it looks like the
name is taken because I made it before taking the screenshot; it will be green
and OK for you). Leave the other settings as they are, and click "Create
Repository" at the bottom.
You should see a screen like this (but with your username):
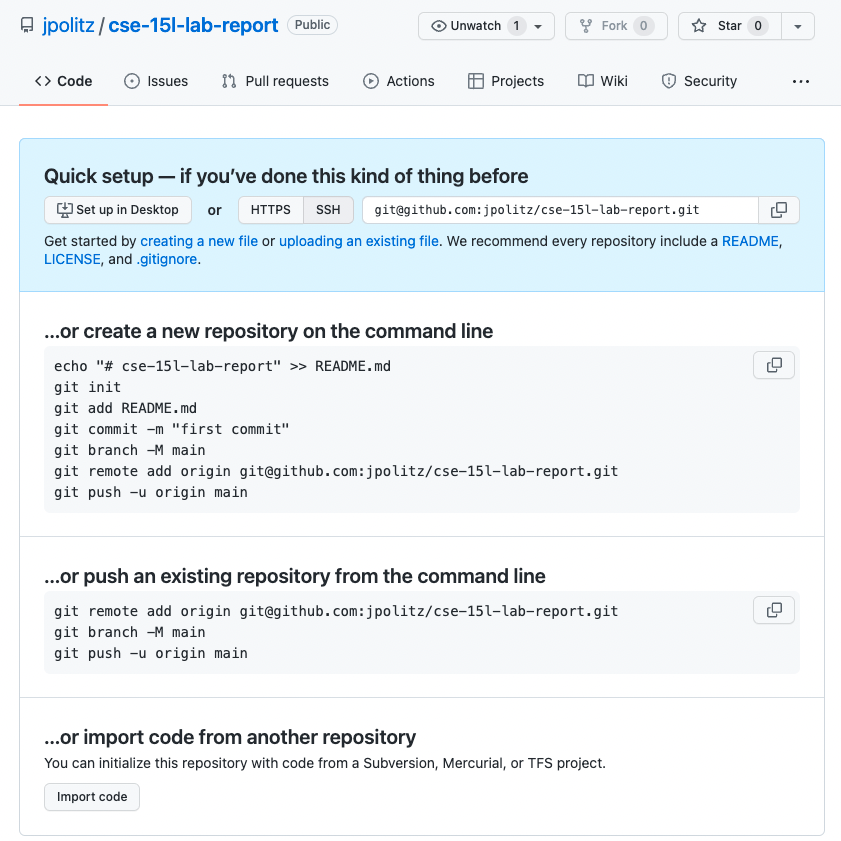
Click the "Create a new file" link (small, in blue, beneath the "Set up in
Desktop" button). Make a new file called index.md, and put some text in it
(whatever you like).
Scroll down to the bottom of the page and click "Commit new file". You should see
a view of your repository that now lists a file called index.md.
You have a public Github repository with some text in it! You can copy the link from your browser and send it to your friends and family to view!
Making a Pages Site
Next, click on "Settings" at the top of your repository, and then choose the "Pages" option in the sidebar:
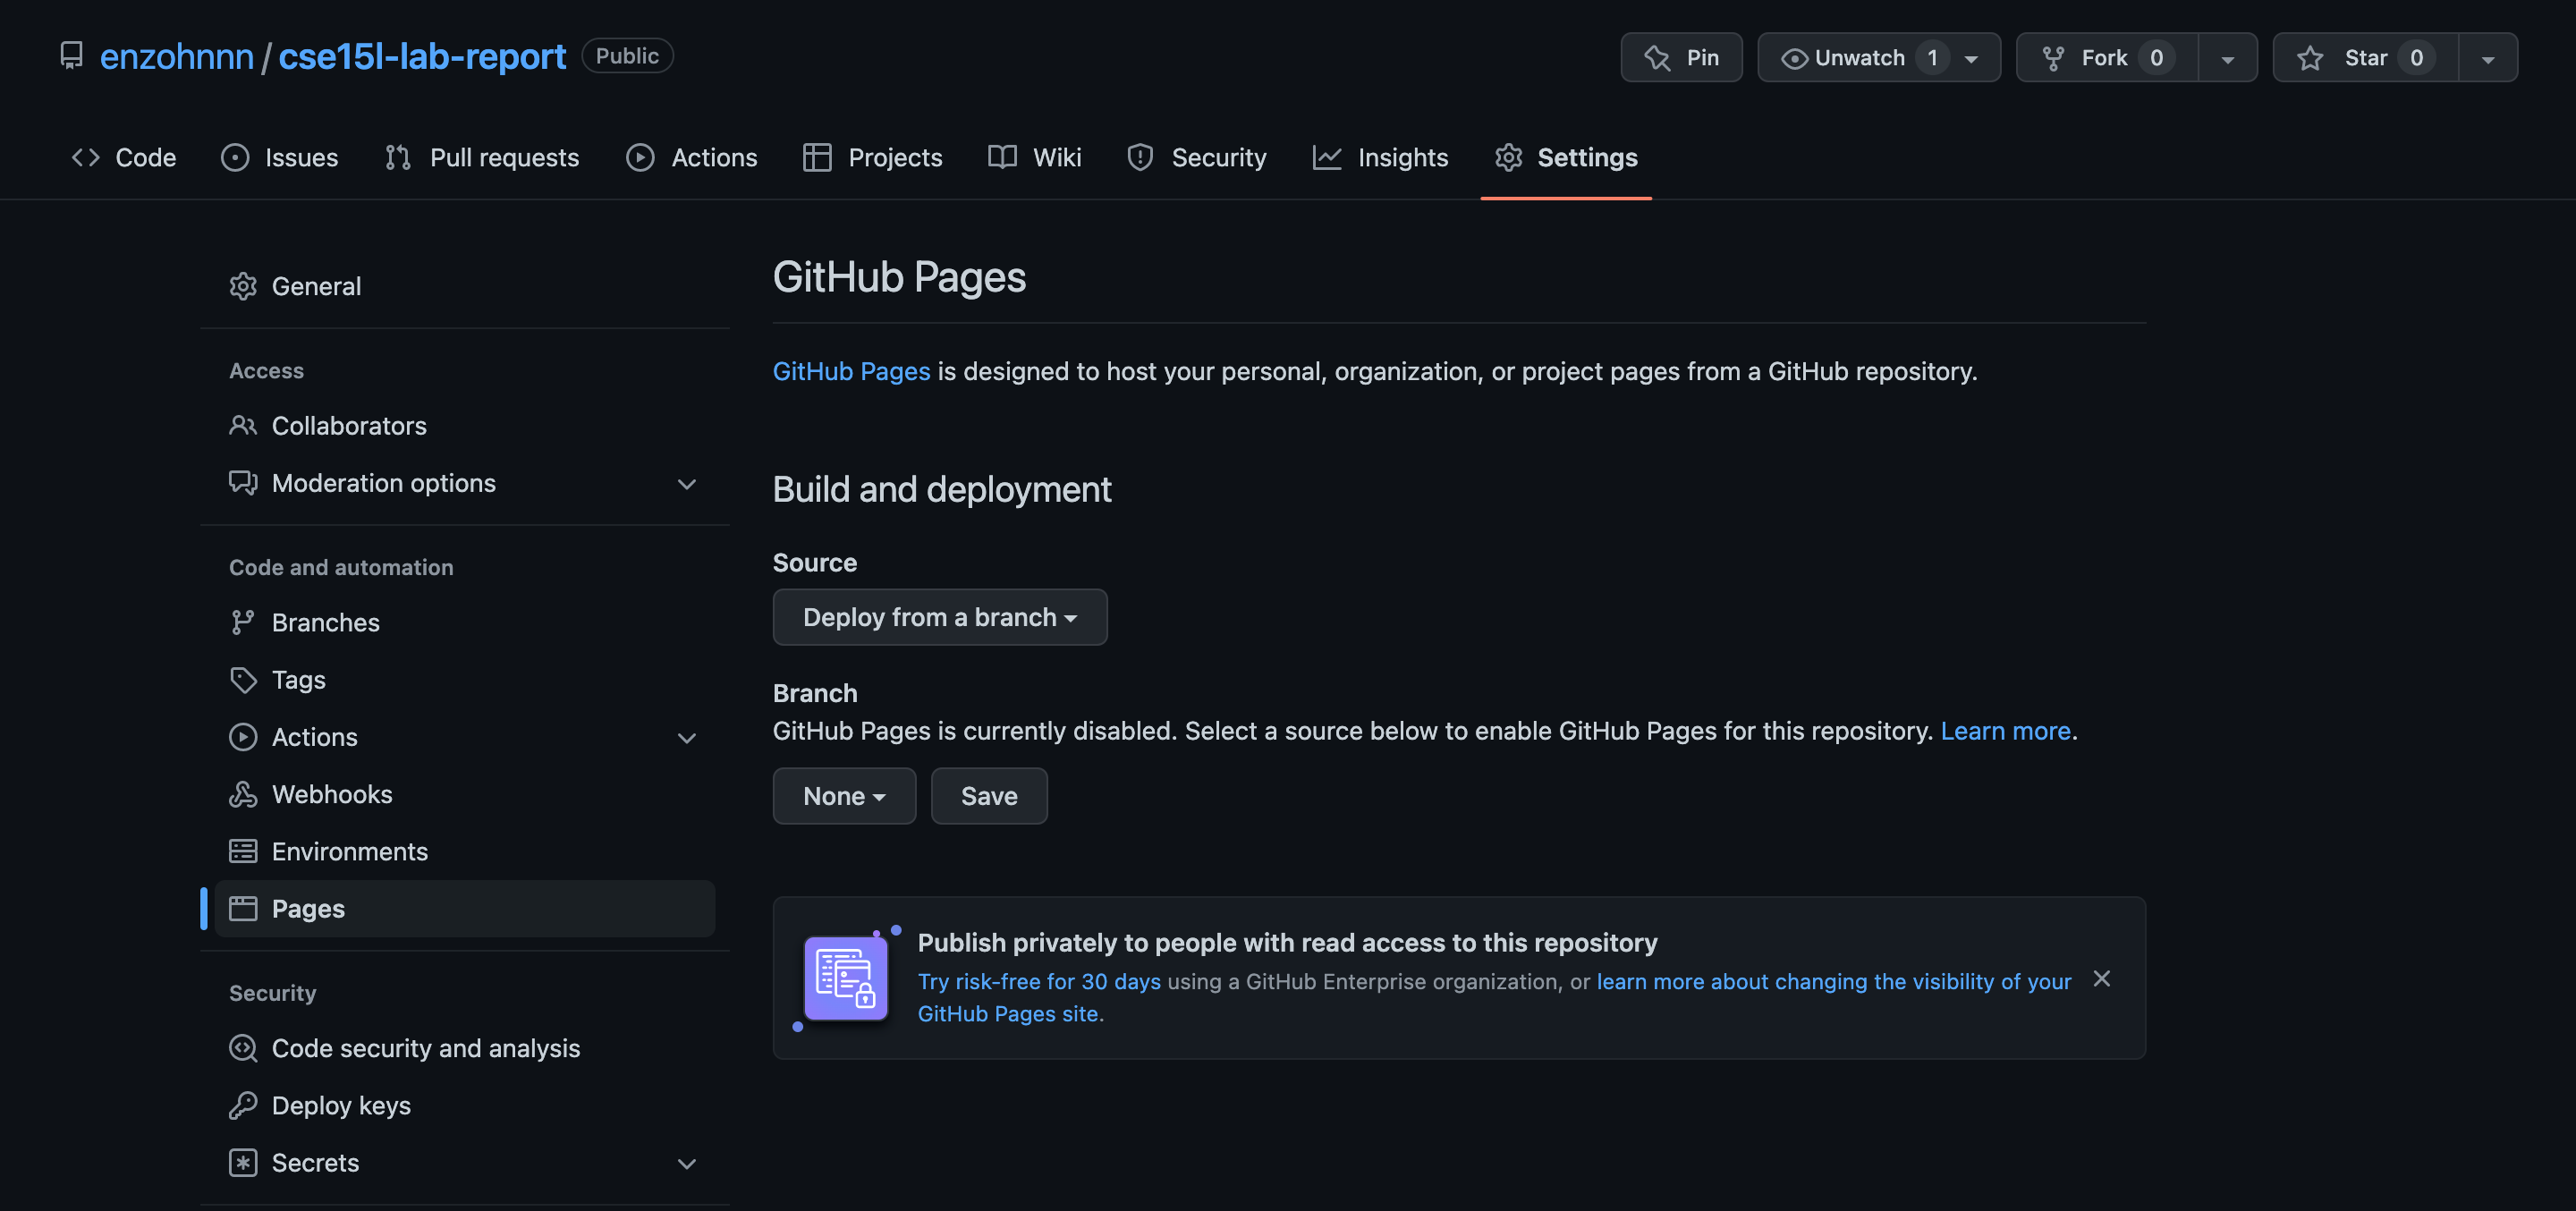
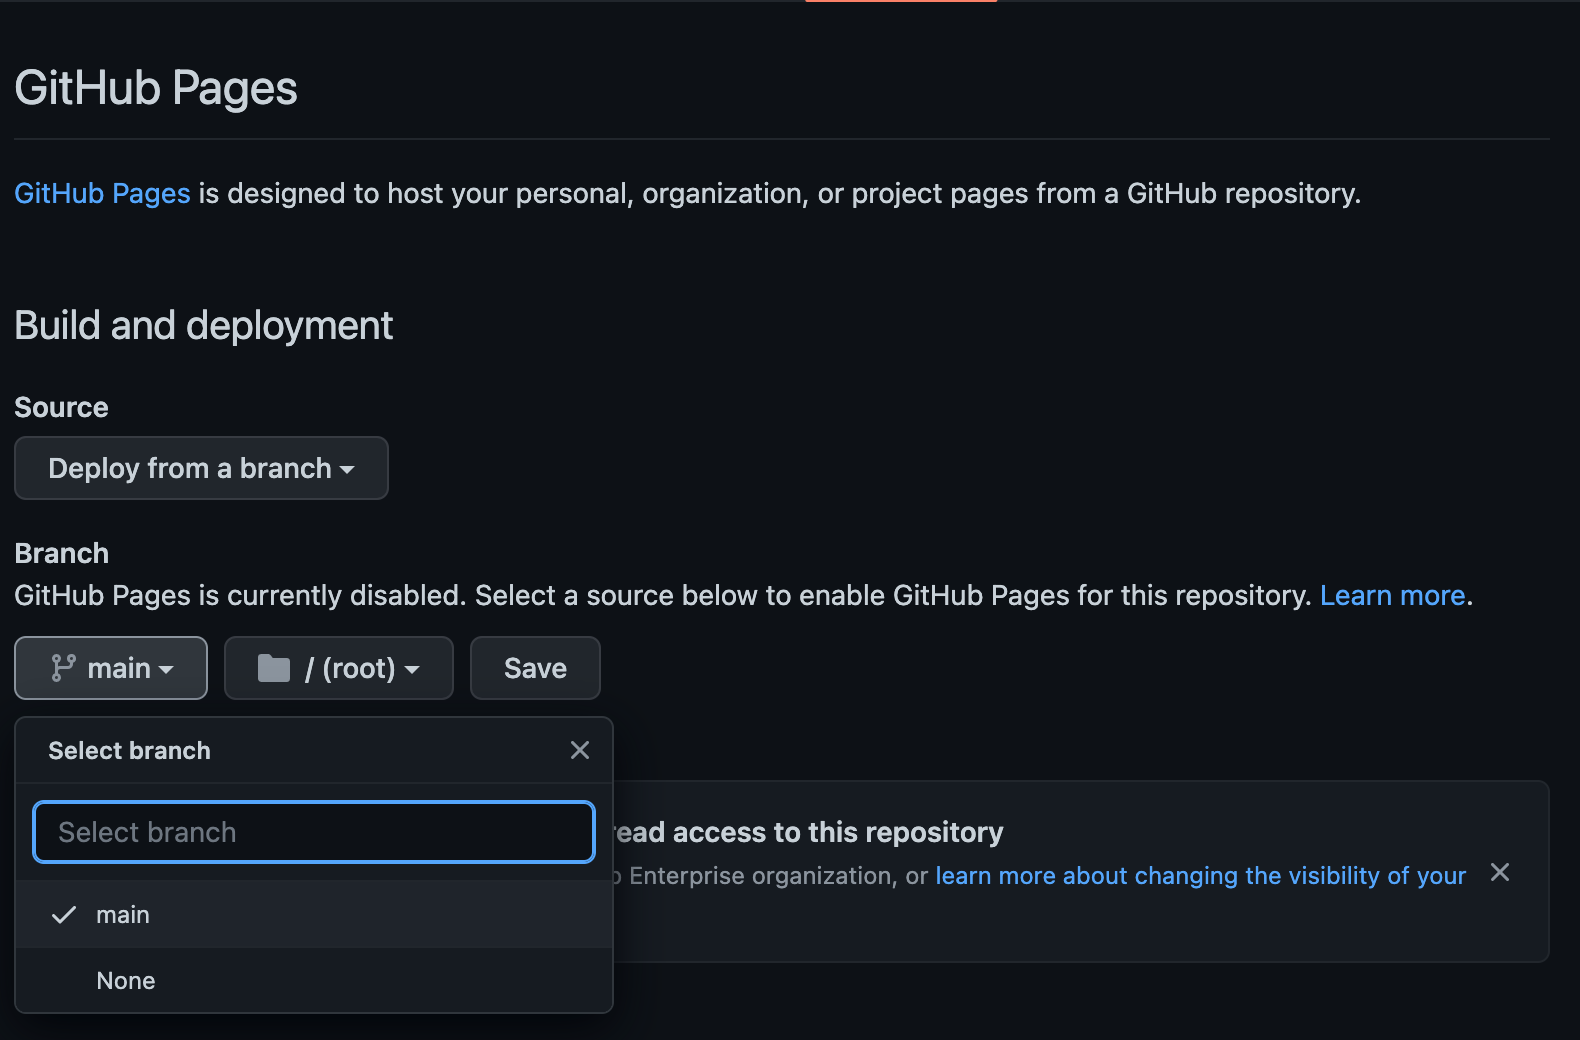
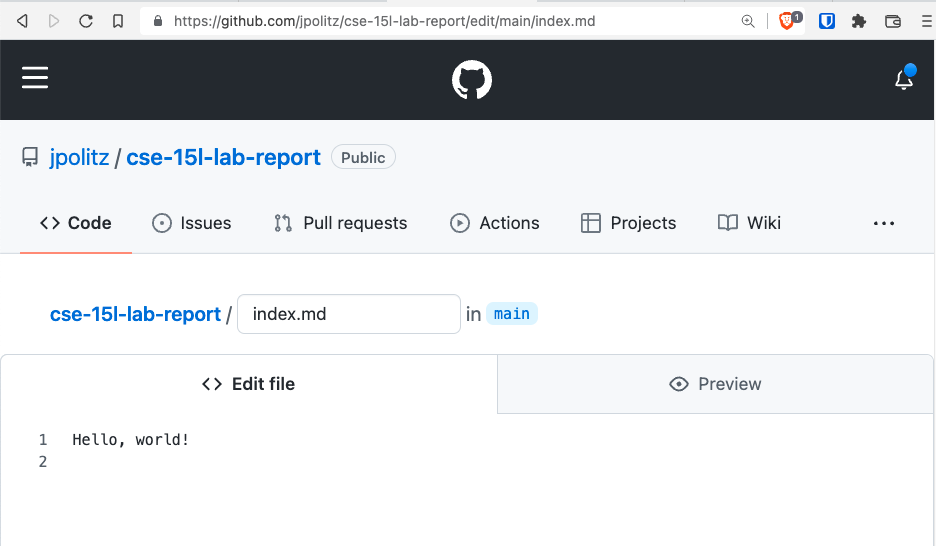
Choose main as the source for Github Pages, and click "Save".
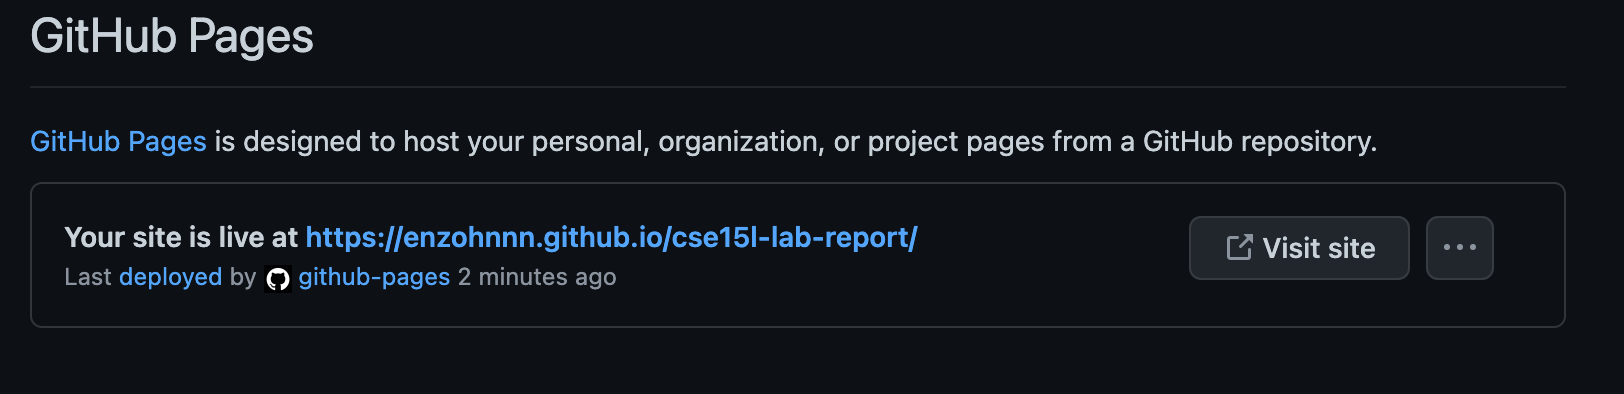
At the top it'll say “GitHub Pages source saved". Wait a bit and refresh the
page. Eventually you'll see a message that says “Your site is live at <url here>.” (This can take a few minutes!) Click the link that's shown there; at
first it will say the page isn't found. Wait a few minutes, then refresh the
page. Then you should see the text you wrote show up on a page like this:
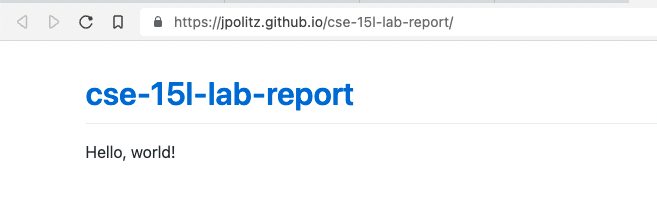
Note that in addition to seeing your file at, e.g,
https://jpolitz.github.io/cse-15l-lab-report/,
you can also see it with index.html added to the end of the URL:
https://jpolitz.github.io/cse-15l-lab-report/index.html
(Try it!).
Do now! Add another file to your repository with any name you choose, but
end it in the extension .md. Can you use this idea to see that file?
Editing Markdown
The .md extension stands for "Markdown," which is a particular text format
used for writing. There are many good documents on the web. A good cheat sheet
and explainer are here:
Skim both of those documents, then try to use some of the elements described in
the cheat sheet in your index.md file. How do some of the different formatting
options show up when you use them? Are any surprising?
You should now have:
- A repository with at least two files (
index.mdand another one you made up) - In one of those files, a use of each kind of basic Markdown syntax
- A page that shows the rendered version of your Markdown text at a public URL
Congratulations – you now know how to make a (simple), public-facing website with basic formatting! You can share the link to your page with anyone in the world with an internet connection, and they can see your page.
(Fun fact: the page you are reading is written in Markdown and uses Github Pages!)
Before you leave
Please go ahead and fill out this Google form before you leave, this will help us create the seating chart for next week. Link to Google form
Lab Report 1 - Remote Access and FileSystem (Week 1)
You’ll submit a lab report by writing a blog post about the basic filesystem commands we learned today. You should create the post, like we just described using Github Pages. The lab report is due Tuesday, January 16 by 10pm. See the FAQ below for common questions, including how to add images and what to submit to Gradescope.
For each of the commands cd, ls, and cat, and using the workspace you created in this lab:
- Share an example of using the command with no arguments.
- Share an example of using the command with a path to a directory as an argument.
- Share an example of using the command with a path to a file as an argument.
So that's 9 total examples (3 for each command). For each, include:
- A screenshot or Markdown code block showing the command and its output
- What the working directory was when the command was run
- A sentence or two explaining why you got that output (e.g. what was in the filesystem, what it meant to have no arguments).
- Indicate whether the output is an error or not, and if it's an error, explain why it's an error.
You will upload your submission by publishing the page on Github Pages, then printing the page to PDF and uploading to the Lab Report 1 assignment on Gradescope.
Note: Make sure to use backticks ` around keywords such as commands, file names, paths, etc. to make them show up as code like cd.
Submission FAQ
Should I submit the Google Doc we used during the lab session for this Lab Report Assignment?
No, this individual lab report submission is about the screenshot tutorial you'll put on your own Github Pages.
You need not upload the shared notes Google doc anywhere.
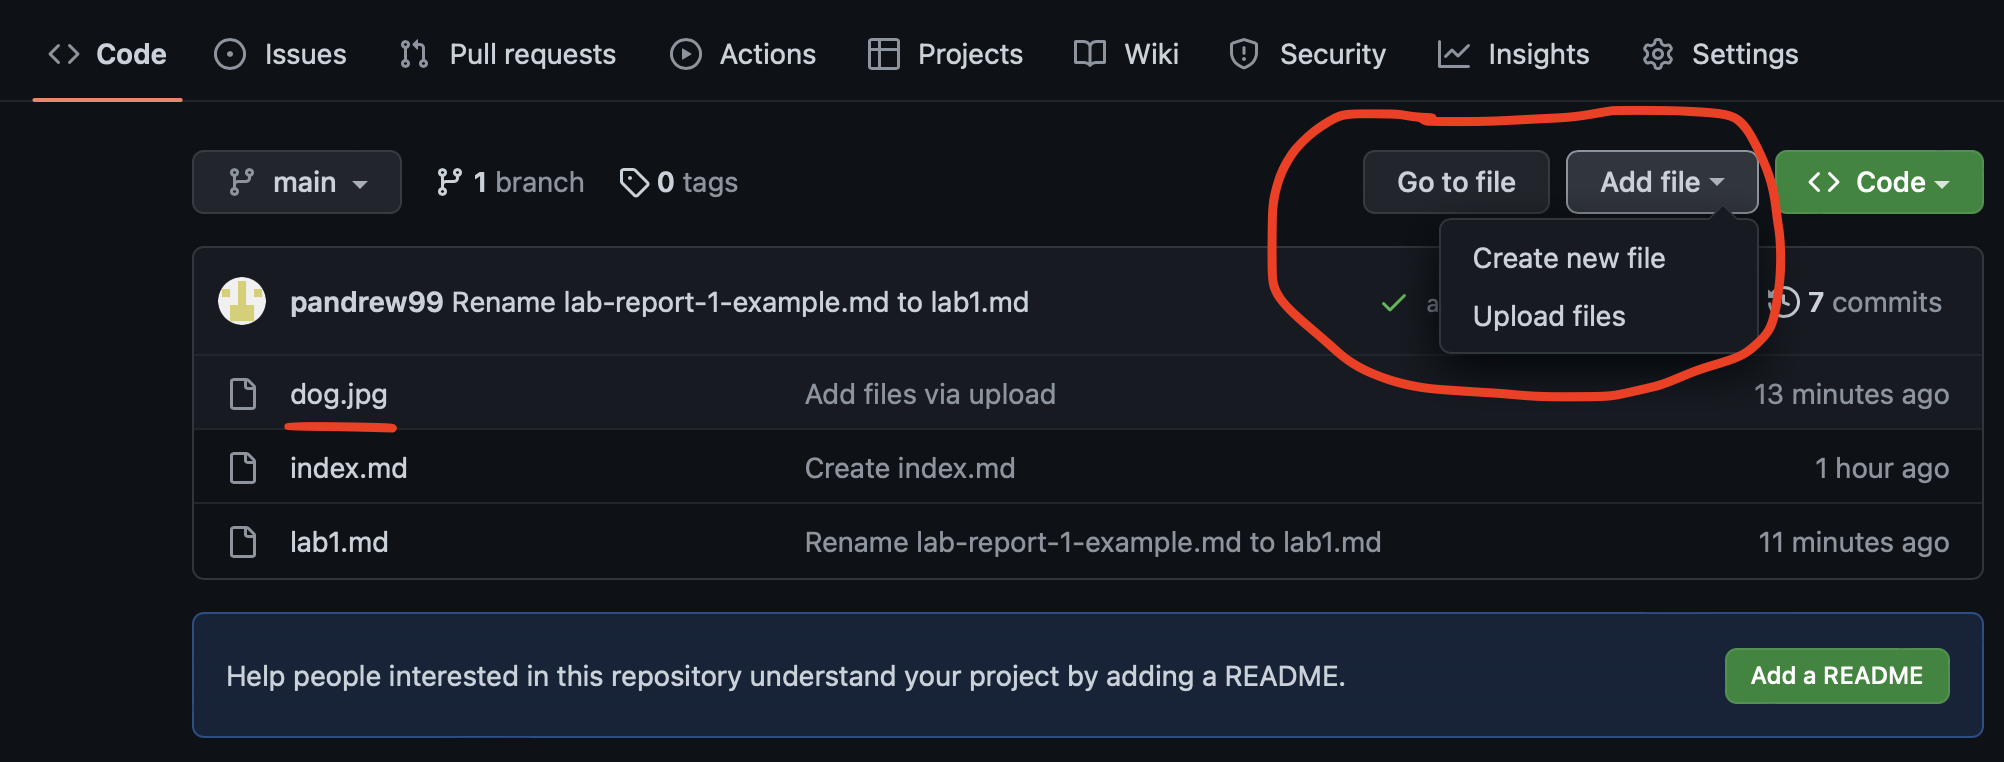
How do I add images/screenshots to my lab report?
In your repository, click the “add file” button and then click “upload files”. Upload
the screenshots you want to include from your computer. Then, in the .md file you
created for your lab report 1, you can add the images by using the 
syntax as described in the markdown cheat sheet link from earlier. Replace imageName.png
with whatever your image is named in your repository.
For example, in the screenshot below, I have dog.jpg in my repository so I could include
that screenshot by typing  in my lab1.md file.
How do I submit my Github Pages site to Gradescope?
Visit your Github Pages website with your tutorial in a browser (Safari, Chrome, Brave,
Firefox, Edge, etc), and use “Print” to save it to a PDF. Then, upload the PDF to the
“Lab Report 1 - Remote Access and Filesystem” assignment on Gradescope. For example,
if your Github Pages site has the link https://pandrew99.github.io/cse15l-lab-reports-example
and you made your lab report 1 .md file called lab1.md, you would access it by adding lab1.html
at the end, like: https://pandrew99.github.io/cse15l-lab-reports-example/lab1.html.
The format of the PDF you submit should look something like this:

Can I use screenshots from the lab document we worked on together?
Sure! If they are from your account, that's fine. Don't share another person's screenshots, instead describe where you got stuck and include a screenshot of what doesn't work.