In this course, we'll explore a number of Software Tools & Techniques that are used commonly by developers in their day-to-day work. You'll learn how to manage files and programs from the command line, and you'll get direct practice (and build muscle memory!) with keyboard shortcuts, tricks, and techniques for managing data and programs. Throughout, you'll exercise and improve your skills in program understanding and debugging.
This web page serves as the main source of announcements and resources for the course, as well as the syllabus.
Textbook/readings: There's no official textbook, but we will link to
different online resources for you to read to supplement lecture. There are a few good general overall resources if you want others to peruse, but these aren't required:
The schedule below outlines topics, due dates, and links to assignments. The
schedule of lecture topics might change slightly, but I post a general plan so
you can know roughly where we are headed.
The course's lab component meets for 2 hours. In each lab you'll switch between
working on your own, working in pairs, and participating in group discussions
about your approach, lessons learned, programming problems, and so on.
The lab sessions and groups will be led by TAs and tutors, who will note your
participation in these discussions for credit. Note that you must
participate, not merely attend, for credit.
If you miss lab, you'll still be held accountable for understanding the
relevant material via Skill Demonstrations and Lab Reports. You can miss 2 labs
without it impacting your grade (see Grading below). There is no
way to make up a lab, even for illness, travel, or emergencies. My preference
would be to require all 10 labs for an A, and have some kind of excused
absences. However, tracking excused absences doesn't really scale, so the “two
for any reason” policy is how we handle it. You don't need to justify your
missed labs. Contact the instructor if you'll miss more than 2 labs for
unavoidable reasons.
In each lecture, we'll have a paper handout (also available electronically). At
the end of lecture you'll have a chance submit your handout to Gradescope. You
can do this by scanning it in the Gradescope app (for iOS and Android) or
through the web interface. To get participation credit for lecture, you have to
submit a handout filled in with reasonable effort. It's fine if answers aren't
right, and some days don't have right answers. It's fine if things aren't
totally complete, and some days we won't finish everything. But it should be
clear from what you submit that you followed along and worked on the exercises we did in class.
If you miss class, you can submit them up until the start of the next class as
late submissions. We recommend completing them while watching the podcast.
We'll have TAs on hand as backup to collect the physical paper/help you scan and
submit if you have any issue submitting. See Grading below for the
required submissions and how that impacts your grade.
Each week there will be an online, untimed, multiple-tries quiz due on
Wednesday at 9 am. The purpose of this quiz is to make sure everyone has checked in on the concepts we will be using in lab on Wednesday and Thursday. They are open for late submission until the end of the quarter, but
see grading below for how late submissions correspond to grades.
Sometimes quizzes have associated readings or videos to supplement lecture.
Every other Tuesday (that's in weeks 2, 4, 6, 8, 10) you will submit a lab report on
work from the previous week or two of lab material. This will take the form of
a blog post on a personal site you created in the first week. At the end of
the quarter this means you'll have a personal web site with 5 posts detailing
what you learned.
For each post, our staff will review it and give a 0-3 score along with feedback:
3 for a complete submission of professional quality that covers all the expectations listed in the report
2 for a complete submission with some mistakes, some unclear writing, or some confusing or nonstandard formatting
1 for a submission missing key components, or clear inaccuracies in multiple components
0 for no submission, a blank submission, or a submission of something irrelevant
After each lab report is graded, you'll have a chance to resubmit it based on the feedback you received, which will detail what you need to do to increase your score. The resubmission deadline is two weeks after the original deadline.
For an original score of 0 or 1, you can raise your score to 2 (but not to 3)
For an original score of 2, you can raise your score to 3
This is also the only late policy for lab reports. Unsubmitted reports are initially assigned a 0, and can get a maximum of 2 points on resubmission.
Several times during the quarter, you will complete a skill demonstrations
-- this course's version of exams. You'll be given a problem to practice in
advance, and then in the demo you'll demonstrate that you can do the task plus some follow-up tasks that are presented during the demonstration.
You can look at the skill demonstrations
from previous offerings for a sense of what tasks we assign (though we may or
may not use the same types in this offering) [W22 demo
1][W22
demo 2]
On each you'll get a Full Pass (2 points), Partial Pass (1 point), or Try Again (0 points) as your score.
In finals week, you'll have the opportunity to improve scores for some number of skill demonstrations. (A few times in class, officially in week 10, this was set to 2 make-ups).
There will be skill demonstrations in weeks 3, 5, 7, and 9 of the quarter. More details
about how you'll complete them will be shared in lab (you'll practice the format and we'll talk about
scheduling them).
Each component of the course has a minimum achievement level to get an A, B, or
C in the course. You must reach that achievement level in all of the
categories to get an A, B, or C.
A achievement:
8 or more lab participation (out of 10 labs)
At least 12 total lab report points
At least 7 total skill demo points (Full Pass on any 3 of the skill demonstrations, Partial Pass on the 4th)
B achievement:
6 or 7 lab participation
At least 10 total lab report points
At least 6 total skill demo points (Full Pass on any 3 of the skill demonstrations, or Partial Pass on two and Full Pass on two)
C achievement:
4 or 5 lab participation
At least 8 total lab report points
At least 4 total skill demo points
Pluses and minuses will be given around the boundaries of these categories at
the instructor's discretion and based on quiz/lecture participation. I don't
publish an exact number for these in advance, but it's consistent across the
class. A general guideline is: if you submit all of the lecture handouts and
all of the quizzes on time and complete, that will definitely add a + to the
grade. If you submit no lecture handouts and no quizzes, that will definitely
add a - to the grade. If you submit about half of each and get things generally
mostly correct, there will be no modifier.
You can use code that we provide or that your group develops in lab as part of
your lab report. Your lab reports can be public. All of the writing in lab
reports must be your own.
You can use an AI assistant like ChatGPT or Copilot to help you author lab
reports or write code in this class. If you do, you are required to include
a section of your lab report that shows:
The prompts you gave to ChatGPT, or the context in which you used Copilot
autocomplete
What its output was and how you changed the output after it was produced
This helps us all learn how these new, powerful, and little-understood tools
work (and don't).
Instructions for skill demonstrations will be posted in the week before they happen.
You're free to collaborate with others on preparing for
the skill demonstration, trying things out beforehand, and so on.
You cannot share details of your skill demonstration with others until
after you receive your grade for it. You cannot communicate with anyone during the skill demonstration.
Can I attend a lab section other than the one I'm enrolled in?
No, please do not try to do this. The lab sections have limited seating and are
full. We cannot accommodate switching.
How can I switch sections?
You have to drop and re-add (which may involve getting [back on] the waitlist).
Sorry.
What do I need to do to get an A?
See the grading section above.
Can I leave lab early if I'm done?
The labs are designed to not be things you can “finish”. Labs have plenty of
extension and exploration activities at the end for you to try out, discuss,
and help one another with. Co-located time with other folks learning the same
things is precious and what courses are for. Also, if you need an extrinsic
motivation, you won't get credit for participation if you don't stay, and
participate, the whole time.
Do I have to come to lab?
Yes, see grading above.
What should I do if I'm on the waitlist?
Attend and complete all the work required while waitlisted (this is consistent
with CSE
policy).
I missed lecture/have to travel for a lecture, what should I do?
Find the associated handout for the week above, watch the
podcast, and hand in a
scan/digital PDF of the handout to Gradescope before the next class.
I missed the late deadline for a lecture handout submission, what should I do?
You cannot submit a lecture handout after the beginning of the next lecture;
move on and focus on getting to the next ones!
I missed lab, what should I do?
You cannot makeup missed lab credit (but have a few “allowed” misses). Make
sure you understand the material from lab because it will be used on skill
demos and lab reports; try to do the parts that don't involve discussion on
your own, and review your group's lab notes.
I missed a quiz deadline, what should I do?
You can submit it late until the end of the quarter. Generally we allow lots
(think like 1/3 to 1/2) of the quizzes to be late without it impacting your
grade, but do take them seriously before lab so you're prepared.
I missed a lab report deadline, what should I do?
Two weeks after each lab report deadline there is a late/resubmission deadline.
You can resubmit then. See the lab report section above for grading details
about resubmissions.
I missed a lab report resubmission deadline, what should I do?
You cannot get an extension on lab report resubmissions; we cannot support
multiple late deadlines and still grade all the coursework on time.
I missed my skill demonstration time, what should I do?
Stay tuned for announcements about scheduling make-ups in finals week.
Where is the financial aid survey?
We do this for you; as long as you submit a quiz, lecture handout, or do a lab
participation in the first two weeks, we will mark you as commencing academic
activity.
Git (You don't necessarily have to install this on its own for your computer; but this is the link to the underlying tool called git. It's included in Github Desktop.)
git repository: A folder that tracks the history of edits to its files
Github repository: A git repository online, like a Google Drive folder with history
Github pages: A service that takes a Github repository and builds a
website from it (usually relying on conventions, like index.md)
Markdown: A way to write plain text files with a little bit of formatting
commit: A set of changes to a file or multiple files in a repository. A
repository history is made up of commits
git clone: A git action to copy a repository from one place to another
(usually from somewhere like Github to our computer). Copies the contents of the
folder and the entire history – the whole repository.
git commit: A git action to take some changes we've made to files and
turn them into a commit in the repository's history
git push: A git action to send commits from one place to another (usually
from our computer to Github)
In this lab you'll make a professional website for yourself where you can post
your lab reports for the course. Please contact the instructor
(jpolitz@ucsd.edu) if for
personal privacy or security reasons you do not want to publish a public
website, even under a pseudonym.
We will split into groups of 6-8 students for discussion. For week 1, you may sit
wherever you want and choose who you want to work with. Starting week 2, we will have
assigned seating and groups. These
groups will be somewhat stable throughout the quarter, though some small changes
will likely happen. You will have a tutor or TA assigned to your group for help
and discussion.
Your discussion leader (the tutor/TA in your lab) will share a Google Doc with
your group where you can fill in notes as you work; this document is only for
your group. Your discussion leader will not take notes for you.
Write down in notes: In your groups, share, and note in the running notes
document (discussion leaders, you answer these as well!):
How you'd like people to refer to you (pronounce your name/nickname, pronouns
like he/her/they, etc)
Your major
One of:
A UCSD student organization you're a member of or interested in
Your favorite place you've found on campus so far
A useful campus shortcut or trick you know
Your answer to the following question. Discuss why you chose that answer.
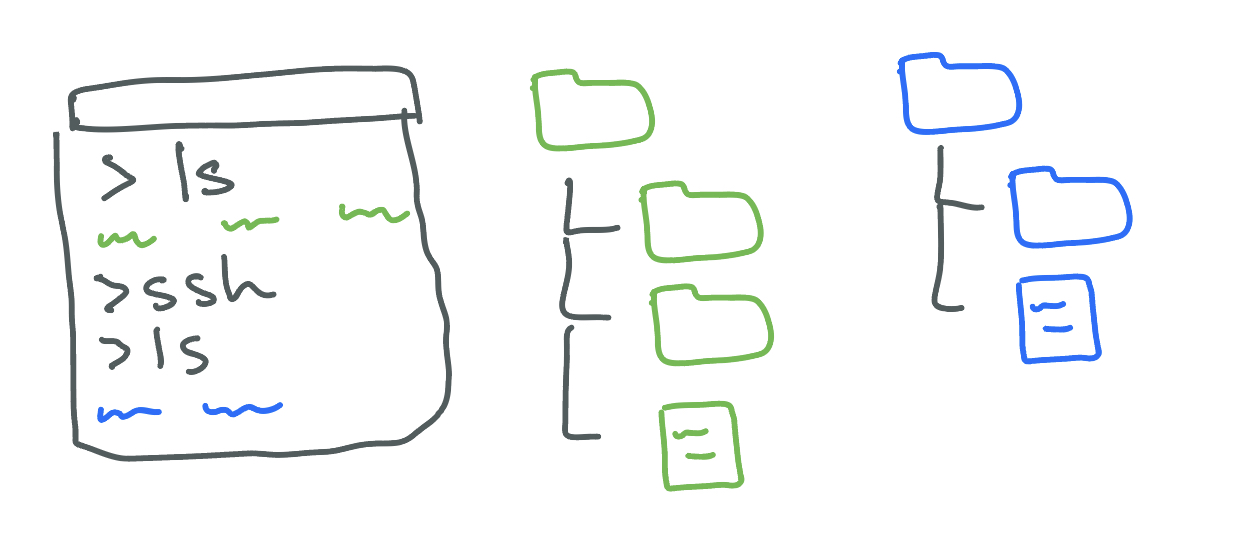
In this part of the lab you'll set up a Workspace, which has a file system and
a terminal we can use to write code and run commands. We'll do this on Edstem,
but many systems you'll use in the future will have a similar notion of a
workspace.
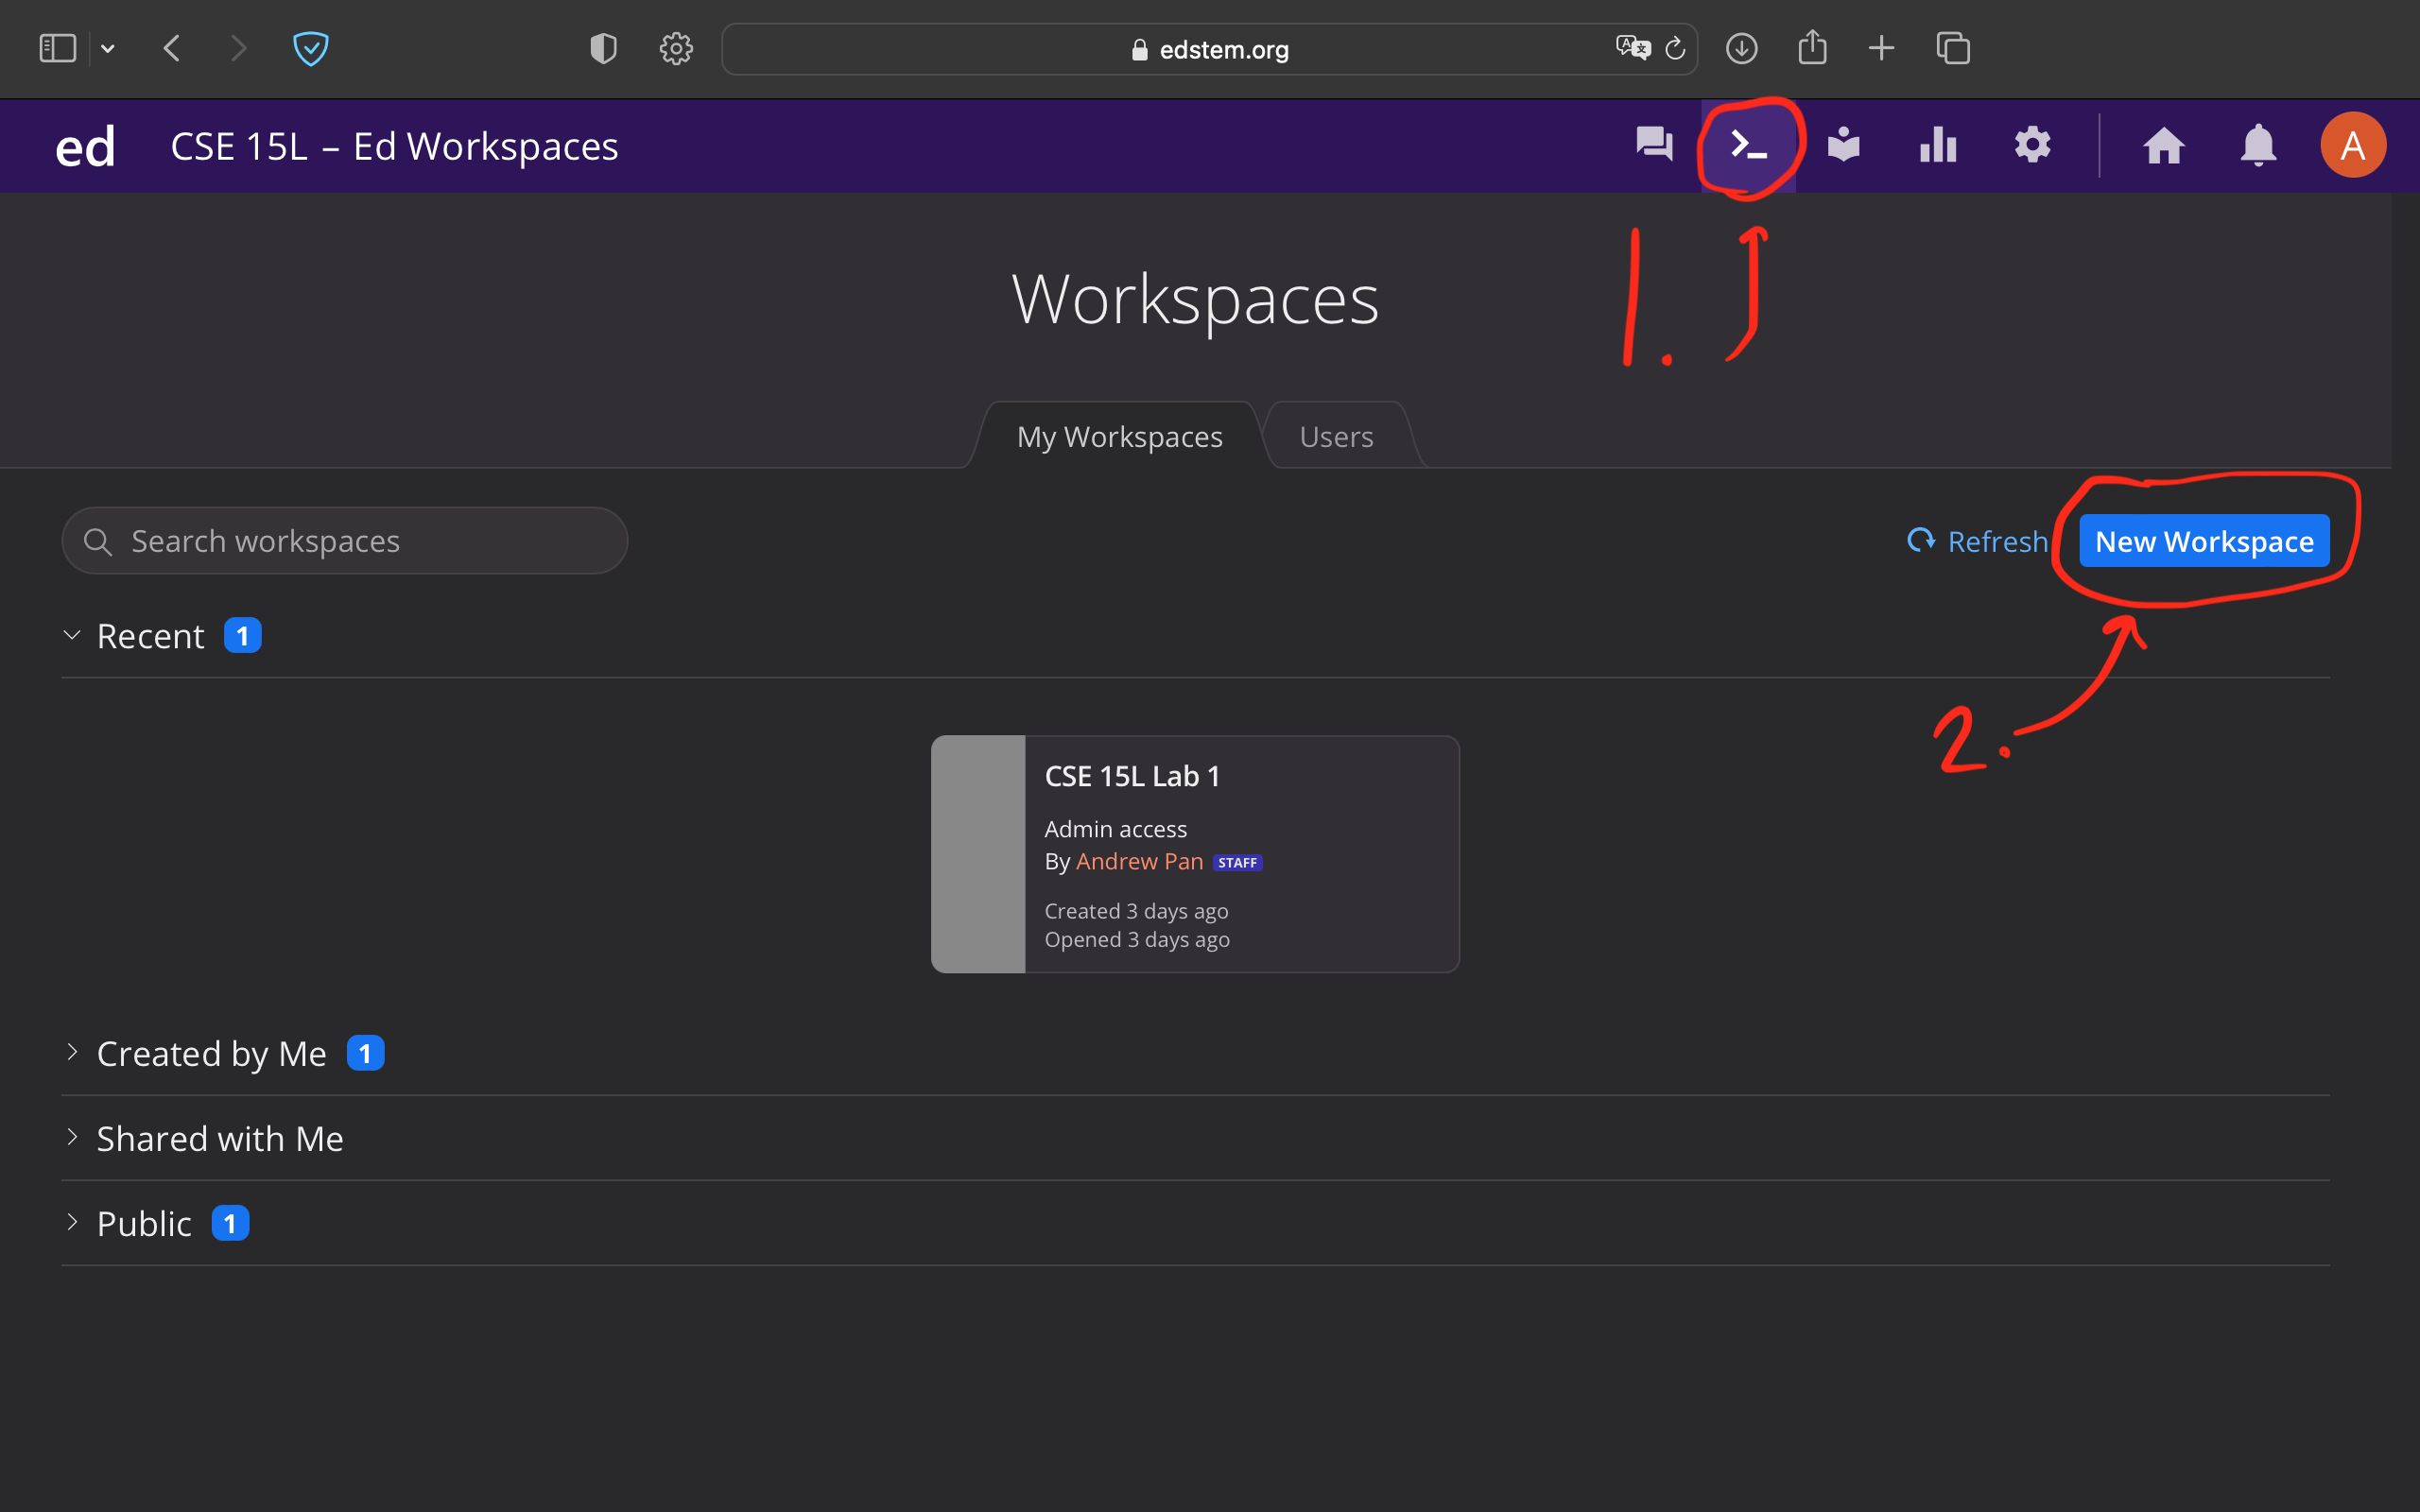
Log into Edstem https://edstem.org, and go to the
“Workspaces” area, and make a new Workspace (see image below). You can pick the
name, but something like “Lab1” is a good idea.
Then, let's access the code from class. Open a terminal,
and run the following command:
To run the command, you can copy it directly from here, paste it into your
terminal, and press Enter.
Write down in notes/discuss: What happened? Write down everything you
noticed happen when you ran that command, and discuss what you saw as a group.
Next, let's make sure we can run the javac and java commands we saw in
class. This will involve running them from the correct working directory.
The git clone command made a folder called lecture1; we'll use the terminal
to change directory into that folder and then run commands there:
Run pwd, this should show a result like /home; you should see this:
[user@sahara ~]$ pwd
/home
Then run cd lecture1. That command produces no output when it works! Try
using pwd again to see what changed. You should see this:
[user@sahara ~]$ cd lecture1
[user@sahara ~/lecture1]$ pwd
/home/lecture1
We see that we changed directories in two ways. First, the prompt changed
– it now says [user@sahara ~/lecture1]$ which is a reminder about which
directory the terminal is in. Also, the output of pwd shows
/home/lecture1, which is the new working directory.
pwd is a useful tool for checking “where your terminal is”. There are
several commands that are good for this kind of status checking, pwd is
the first we'll learn.
Now run ls; you should see something like this:
[user@sahara ~/lecture1]$ ls
Hello.java  messages  README
ls shows the names of the files and folders inside the current working
directory. It's another useful status-checking command.
Finally, let's get to running the java commands. First, run javac:
javac Hello.java
Write down in notes/discuss: What happened? Write down everything you
noticed happen when you ran that command, and discuss what you saw as a group.
(Hint: did any new files related to Hello.java get created? Can you see them
with ls or in the file browser in the workspace?)
Next, run this command (feel free to pick any of the three languages!)
java Hello messages/es-mx.txt
Write down in notes/discuss: What happened? What output do you see? How
does the output relate to the code in the Hello.java file?
Add a new language file to messages (you can pick a language and use the
official code by looking at
https://www.andiamo.co.uk/resources/iso-language-codes/).
It should be called <language-code>.txt in the messages directory, and have
“Hello World!” translated into the language you chose.
If someone in your group knows the language, they can write it directly, or you could use Google
Translate or other similar tools!
Write down in notes: Take a screenshot of running java on your newly-added
language file and include it in your notes.
Having a professional portfolio website for yourself can be useful in many, many
ways. It's a useful URL to put at the top of your resume/CV where potential
employers can learn more about you. Lots of great work in CS is published only on
someone's personal page, or is at least most accessible there. Most CS faculty
have such a page (justa
fewexamplesfrom
new CSE
faculty), for example.
Also, journaling and logging what you've learned is a powerful tool. Writing
down what we've done and how we've done it, for an audience (real or imagined)
other than ourselves, forces us to confront lingering misconceptions and cements
what we learned in our memories. It's also simply useful to refresh your memory
later!
For these reasons, we'll spend the rest of this lab creating a personal page,
and then learning to write a blog post about what we learned.
Github (https://www.github.com) is a web service for storing and
sharing code, along with a huge number of services surrounding that code. It
uses a tool and protocol called githttps://git-scm.com/ to store and
retrieve that code. Github Pages
https://pages.github.com/ is one of the services
Github provides for publishing personal and project websites from your Github
account.
This lab is a basic introduction to all of these. We will learn to use them in
more detail as the quarter goes on; learning all that git, Github, or Github
Pages has to offer could take months of practice!
(If you already have an account, you choose if you want to use it or create a
new one for this course).
You can choose any username you like for the account; it doesn't have to be
related to your legal or preferred name, though it can be and often is. Some
people choose names related to their name, like me (my Github account is
jpolitz). Others choose more abstract or whimsical
names for their accounts, just like usernames on any other service. Feel free to
do whatever feels right to you, and in any event, you can always change it
later.
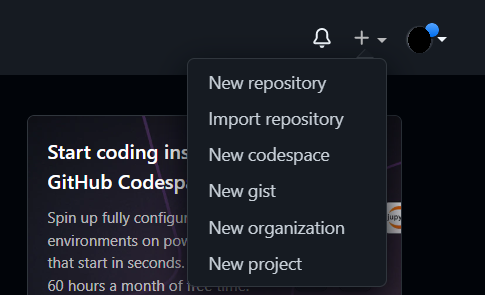
Once you've created your account, we are going to create a new repository on
Github. A repository is a folder or directory with an associated history of
changes that were made to the files within it. In this sense, a repository on
Github has some similarities to a folder in Google Drive; the differences are
mainly in the level of control we get in managing that history of changes.
Name the repository cse15l-lab-reports (in my screenshot it looks like the
name is taken because I made it before taking the screenshot; it will be green
and OK for you). Leave the other settings as they are, and click "Create
Repository" at the bottom.
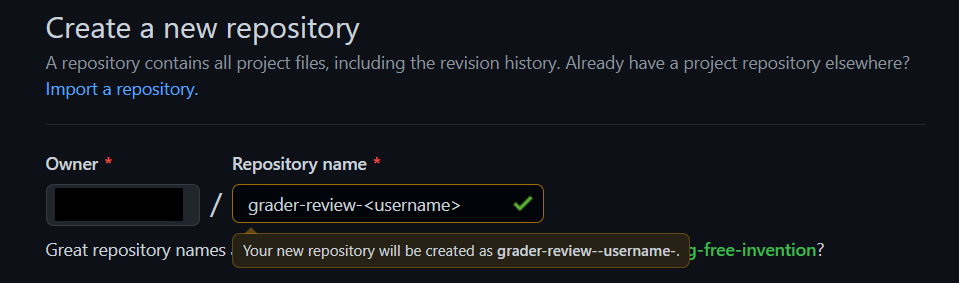
You should see a screen like this (but with your username):
Click the "Create a new file" link (small, in blue, beneath the "Set up in
Desktop" button). Make a new file called index.md, and put some text in it
(whatever you like).
Scroll down to the bottom of the page and click "Commit new file". You should see
a view of your repository that now lists a file called index.md.
You have a public Github repository with some text in it! You can copy the link from your browser and send it to your friends and family to view!
Next, click on "Settings" at the top of your repository, and then choose the
"Pages" option in the sidebar:
Choose main as the source for Github Pages, and click "Save".
At the top it'll say “GitHub Pages source saved". Wait a bit and refresh the
page. Eventually you'll see a message that says “Your site is live at <url here>.” (This can take a few minutes!) Click the link that's shown there; at
first it will say the page isn't found. Wait a few minutes, then refresh the
page. Then you should see the text you wrote show up on a page like this:
The .md extension stands for "Markdown," which is a particular text format
used for writing. There are many good documents on the web. A good cheat sheet
and explainer are here:
Skim both of those documents, then try to use some of the elements described in
the cheat sheet in your index.md file. How do some of the different formatting
options show up when you use them? Are any surprising?
You should now have:
A repository with at least two files (index.md and another one you made up)
In one of those files, a use of each kind of basic Markdown syntax
A page that shows the rendered version of your Markdown text at a public URL
Congratulations – you now know how to make a (simple), public-facing website
with basic formatting! You can share the link to your page with anyone in the
world with an internet connection, and they can see your page.
You’ll submit a lab report by writing a blog post about the basic filesystem commands we learned today. You should create the post, like we
just described using Github Pages. The lab report is due Tuesday, January 16 by 10pm.
See the FAQ below for common questions, including how to add images and what to submit
to Gradescope.
For each of the commands cd, ls, and cat, and using the workspace you created in this lab:
Share an example of using the command with no arguments.
Share an example of using the command with a path to a directory as an argument.
Share an example of using the command with a path to a file as an argument.
So that's 9 total examples (3 for each command). For each, include:
A screenshot or Markdown code block showing the command and its output
What the working directory was when the command was run
A sentence or two explaining why you got that output (e.g. what was in the filesystem, what it meant to have no arguments).
Indicate whether the output is an error or not, and if it's an error, explain why it's an error.
You will upload your submission by publishing the page on Github Pages, then
printing the page to PDF and uploading to the Lab Report 1 assignment on
Gradescope.
Note: Make sure to use backticks ` around keywords such as commands, file names, paths, etc. to make them show up as code like cd.
Should I submit the Google Doc we used during the lab session for this Lab
Report Assignment?
No, this individual lab report submission is about the screenshot tutorial
you'll put on your own Github Pages.
You need not upload the shared notes Google doc anywhere.
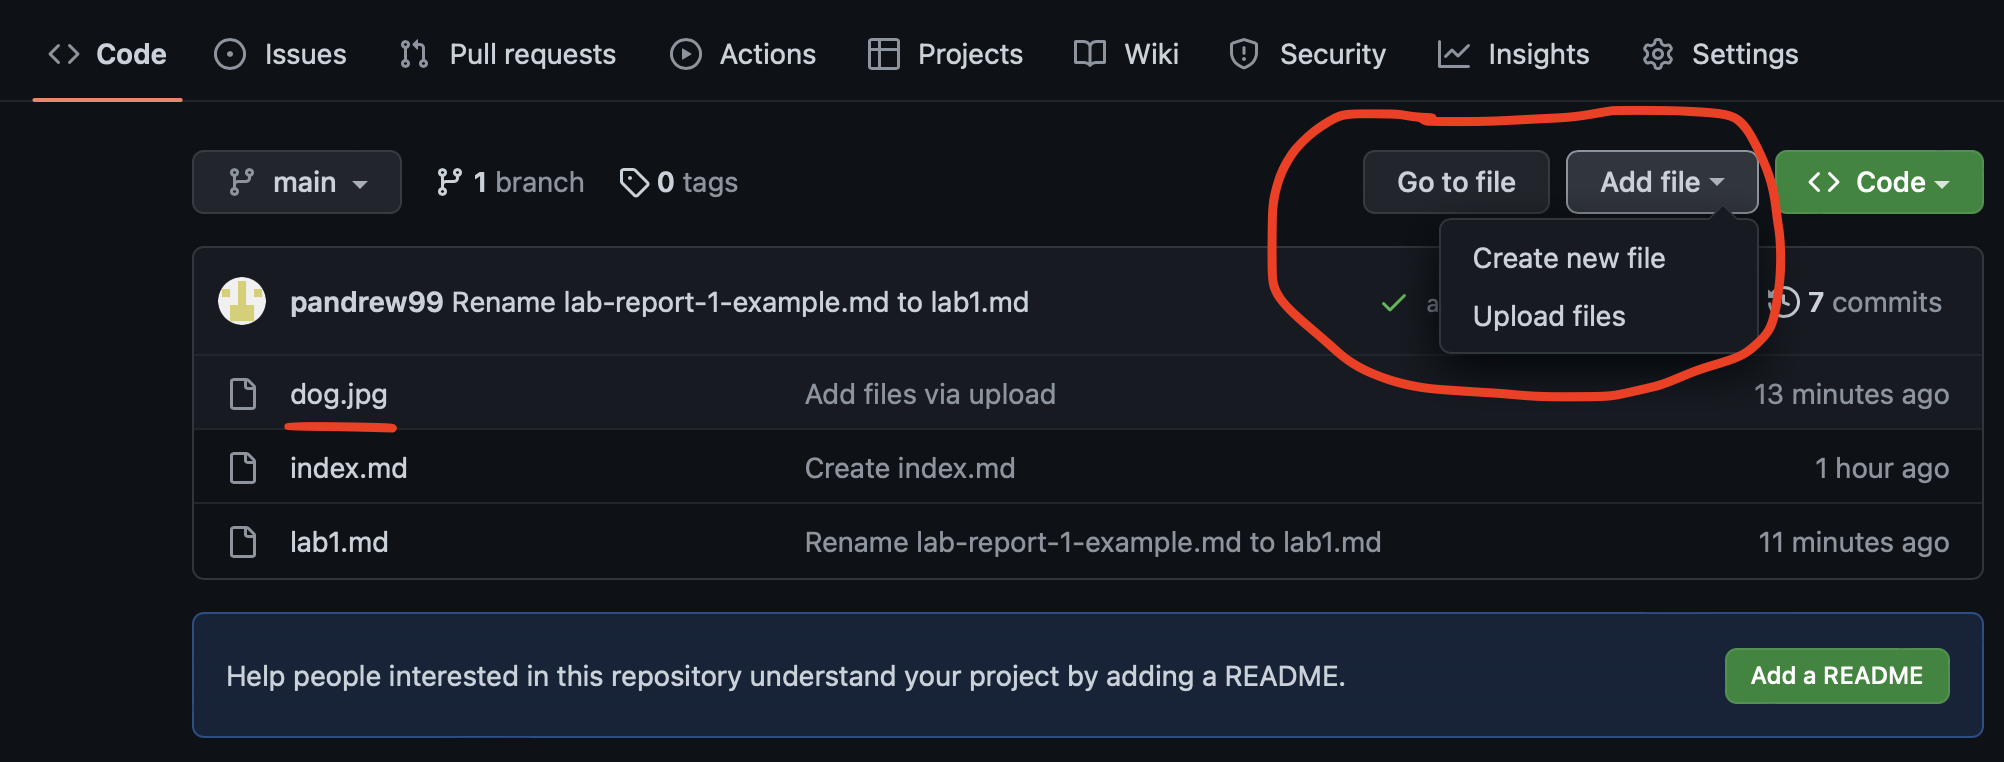
How do I add images/screenshots to my lab report?
In your repository, click the “add file” button and then click “upload files”. Upload
the screenshots you want to include from your computer. Then, in the .md file you
created for your lab report 1, you can add the images by using the 
syntax as described in the markdown cheat sheet link from earlier. Replace imageName.png
with whatever your image is named in your repository.
For example, in the screenshot below, I have dog.jpg in my repository so I could include
that screenshot by typing  in my lab1.md file.
How do I submit my Github Pages site to Gradescope?
Visit your Github Pages website with your tutorial in a browser (Safari, Chrome, Brave,
Firefox, Edge, etc), and use “Print” to save it to a PDF. Then, upload the PDF to the
“Lab Report 1 - Remote Access and Filesystem” assignment on Gradescope. For example,
if your Github Pages site has the link https://pandrew99.github.io/cse15l-lab-reports-example
and you made your lab report 1 .md file called lab1.md, you would access it by adding lab1.html
at the end, like: https://pandrew99.github.io/cse15l-lab-reports-example/lab1.html.
The format of the PDF you submit should look something like this:
Can I use screenshots from the lab document we worked on together?
Sure! If they are from your account, that's fine. Don't share another person's screenshots,
instead describe where you got stuck and include a screenshot of what doesn't
work.
As usual, you can read ahead and are encouraged to prepare! Keep in mind that
the lab isn't guaranteed to be final until the day of the lab, and a lot of the
exercises are collaborative, so you can't truly “finish it ahead of time”.
Today we'll use some of what we learned about URLS to create a web server.
Many courses in CSE use course-specific accounts. These are similar to accounts
you might get on other systems at other institutions (or a future job). We'll
see how to use the terminal in EdStem.
Open a terminal in EdStem. To use ssh, your command will look like this, but
with the user replaced by your specific TritonLink username.
$ ssh user@ieng6.ucsd.edu
Since this is likely the first time you've connected to this server, you will
probably get a message like this:
$ ssh user@ieng6.ucsd.edu
The authenticity of host 'ieng6.ucsd.edu (128.54.70.227)' can't be established.
RSA key fingerprint is SHA256:ksruYwhnYH+sySHnHAtLUHngrPEyZTDl/1x99wUQcec.
Are you sure you want to continue connecting (yes/no/[fingerprint])?
I (Joe) always say yes to these messages when I'm connecting to a new server for
the first time; it's expected to get this message in that case. If you get this
message when you're connecting to a server you connect to often, it could mean
someone is trying to listen in on or control the connection. This answer is a
decent description of what's going on: Ben Voigt's
answer
So type yes and press enter, then type the password for your TritonLink user account; the whole interaction
should look something like this once you give the password and are logged in:
# On your client
$ ssh user@ieng6.ucsd.edu
The authenticity of host 'ieng6-202.ucsd.edu (128.54.70.227)' can't be established.
RSA key fingerprint is SHA256:ksruYwhnYH+sySHnHAtLUHngrPEyZTDl/1x99wUQcec.
Are you sure you want to continue connecting (yes/no/[fingerprint])?
Password:
# Now on remote server
Last login: Sun Jan  2 14:03:05 2022 from 107-217-10-235.lightspeed.sndgca.sbcglobal.net
quota: No filesystem specified.
Hello user, you are currently logged into ieng6-203.ucsd.edu

You are using 0% CPU on this system

Cluster Status
Hostname     Time    #Users  Load  Averages
ieng6-201   23:25:01   0  0.08,  0.17,  0.11
ieng6-202   23:25:01   1  0.09,  0.15,  0.11
ieng6-203   23:25:01   1  0.08,  0.15,  0.11

To begin work for one of your courses [ cs15lwi24 ], type its name
at the command prompt.  (For example, "cs15lwi24", without the quotes).

To see all available software packages, type "prep -l" at the command prompt,
or "prep -h" for more options
Now execute the following command
$ cs15lwi24
(That's one, five, l (lowercase letter L, not one); the one and l look very
close in some fonts. And remember that when we write the $, that's not for you
to type in! It's just a convention for how we write commands.)
You should get the following output:
Sun Jan 02, 2022 11:28pm - Prepping cs15lwi24
Now your terminal is connected to a computer in the CSE basement, and any
commands you run will run on that computer! We call your computer the client
and the computer in the basement the server based on how you are connected.
If, in this process, you run into errors and can't figure out how to proceed,
ask! When you ask, take a screenshot of your problem and add it to your group's
running notes document, then describe what the fix was. If you don't know how to
take a screenshot, ask!
Remember – it is rare for a tutorial to work perfectly. We often have to
stop, think, guess, Google search, ask someone, etc. in order to get things to
work the way the tutorial says. I look up the right way to describe the
(yes/no) answer on first login all the time, for example. So you are helping
your group learn about potential issues when you do this, and that's a major
learning outcome of the course! If you see someone else have an issue that you
didn't, ask why, and what might be different about what you did, or how your
environment is set up. You will learn by reflecting on this.
Write down in notes: When you're done, discuss what you saw upon login.
Take a screenshot or copy/paste the output. Did you all see the same thing? What
might the differences mean? Note the results of your discussion in the notes
document.
We have assigned you into groups that you will collaborate in for the rest of the
quarter. When you arrive at your lab, see the screen at the front of the room to
find your assigned seat.
Write down in notes – In your groups, share, and note in the running notes
document (discussion leaders, you answer these as well!):
How you'd like people to refer to you (pronounce your name/nickname, pronouns
like he/her/they, etc)
Your major
One of:
A UCSD student organization you're a member of or interested in
Your favorite place you've found on campus so far
A useful campus shortcut or trick you know
Your answer to the following question. Discuss why you chose that answer.
There's a lot that web servers can do. We will start with a small fragment of
their behavior that is enough to do interesting work. For now we'll focus on
programs that take a URL as input and respond with the text of a web page. We'll
call the part of the program that does this processing a URLHandler:
We'll also use a class that takes a URLHandler and starts up the server that
listens for incoming connections.
class Server {
  static void start(int port, URLHandler handler) { ... }
}
(Note that it says URI, not URL. There isn't a meaningful difference between
these concepts for our purposes, and all the URIs we work with are also URLs.
Java has good documentation on
URI. We'll discuss
what a port is below.).
We've provided an implementation of a web server that works with this interface here:
In your workspace—everyone can make their own—and clone that repository into it. Make sure you aren't logged in to ieng6 when you do this clone. The first thing we do will be all on EdStem.
There are two files in this repository:
Server.java – we (the staff) wrote this and you can treat it as a “black box”, without
understanding its details for today. Of course, you're welcome to read it and
ask questions about it, but we might defer your questions to Edstem, office
hours, or later to focus on the work specific to this lab.
NumberServer.java – this is a program with a main method that creates a
URLHandler that manages a single number, and uses Server.java to start a web
server using that handler.
Read through the code in NumberServer.java. Discuss with your partner what you think each line or code block does.
Write down in notes - What questions do you and your partner still have? It’s OK to have open questions at this point! Many will be resolved by the next few sections.
You can build and run the server in your EdStem workspace using these two
commands, from the directory created by cloning of the repository. (Remember, you might have to cd into that directory!) It should
look like this when it works:
$ javac Server.java NumberServer.java
$ java NumberServer 4000
Server Started!
On EdStem, you can use the “Network” option in the menubar (it looks like the wifi symbol) and it will show you a link
you can use to visit the running web server:
This will open a new window or tab that looks something like this:
There are a few definitions worth discussing here:
Ports: The 4000 above identifies a specific port that the web server
runs on. This is an extra part of a URL that's often used in development; 4000
isn't special and you could pick others – you're welcome to try a few in the
thousands; it won't break anything. Sites on the public web actually use a port
as well, either
80 or
443, but your browser hides it from you
because it's the default. You're welcome to read about these details, but they
aren't necessary to learn continue in this lab.
It's also worth pointing out that the terminal will just sit there without
letting you type more commands while the server is running: it is in an infinite
loop waiting for the next URL request to come in! You can stop the server by
pressing Ctrl-c (this works for any terminal command that's in an infinite
loop).
Try out URLs with paths and queries on the running server as described in
NumberServer.java. Based on the code, what paths and query combinations do you
think will have interesting effects? Try them out!
If you're stuck, a first one to try is the /increment path. To visit it, you can
edit the URL bar in your browser directly when visiting the server. Try adding /increment at
the end and then pressing Enter to load the page. What does it say? What other paths do you see in the code that you could try?
If you want another, try /add. What's different about using /add compared to /increment?
Try editing line 11 of NumberServer.java to include your name before the number is displayed. Example output:
Edwin’s number: 3
Because we’ve made a new change to our server, we need to restart the server for those changes to be displayed on the web browser.
To stop the server, press Ctrl-C, then restart the server by running the same commands as earlier that we used to start it (javac and java commands).
Write down in notes – show a screenshot of trying each of the paths that
provide a response based on your reading of NumberServer.java. There should be
4: the root path, one for incrementing, one for adding by a specific count, and
one that shows an error.
Next, log into your account on ieng6. Then clone the same wavelet repository there.
Now, run your web server on ieng6 using the same java and javac commands that you used to run it on your local machine. Note that there are only 3 ieng6 computers (you'll see that you've connected to
ieng6-201, ieng6-202, or ieng6-203 in the prompt), which presents a
problem – each one only has one port 4000. If multiple people try to use the
same port at the same time on the same computer, there will be an error:
# On remote server
[user@ieng6-202]:wavelet:123$ java NumberServer 4000
Exception in thread "main" java.net.BindException: Address already in use
        at sun.nio.ch.Net.bind0(Native Method)
        at sun.nio.ch.Net.bind(Net.java:461)
        at sun.nio.ch.Net.bind(Net.java:453)
So you can't all use port 4000. If you want something unique for this lab
you can use 4000 + the number of the machine you're sitting in front of if in
room B260, and 7000 + that number if in room B270. Or experiment!
The cool thing about running it on these computers is you can access it from
other computers! After starting the server, you can load your web page from
other places! For example, if you're on ieng6-201.ucsd.edu running on port
1234, you can open http://ieng6-201.ucsd.edu:1234 from another computer in the
lab or your laptop to see the output of the running server (this only works from
the UCSD network, so that means you'd need to be on the UCSD-Protected network).
Neat – you've deployed a web server!
Write down in notes - Team up with another member of your group that you haven't worked with yet.
Get their server URL and port number, and access their number server on
your computer (HINT: You may want to share the URL and port number on
your group's Google Doc). Take a screenshot of your computer loading a webpage of
their server, which should show the current number (though not their name!). Was their web server running on the same ieng6 machine as yours? The same port?
Write down in notes – If you have multiple browsers on different computers
all incrementing the number on one web server, do they all see one anothers'
increments? As accurately as possible, describe where the number is stored.
Write down in notes - Brainstorm a little bit. Now that you have the ability
to make a web server, what are some ideas for other applications you could
create? Think about things you could plausibly build with your knowledge of Java
plus this server interface. What else might you need to go further?
Write down in notes – When you ran the server on ieng6, it didn't include your name (where you made it say [Your Name] : <number> on EdStem), even though you made that edit. Why not? What are things you could do, using only what we've seen in class so far, to get that version of the code on the server. Hint – you can make new public Github repositories yourself!
A web browser isn't the only way to access web pages. There are also commands
that can be used to access URLs. One of these commands is called curl. You
can use it like this:
You could visit that URL in a web browser (to see some Java code from class),
or run the curl command from the command line with the URL as an argument.
By default curl prints out what it accesses to the terminal.
You can also use curl to load the URLs for the server! It has the same
restrictions on access as whatever computer you're running it from. So that
means from the terminal on your local computer, a curl command would load
ieng6-20x URLs if you're connected to UCSD-Protected. But you can also log
into an ieng6 server from your terminal and run curl from there, and use
that method to test your web server even if your laptop isn't on
UCSD-Protected. Try both things – using curl from your computer's local
terminal and from one logged into ieng6 to access your server.
Keep in mind this might mean you need to open two terminals, one to start the
server and one to load the URL.
Write down in notes. Take a screenshot of two terminals, side-by-side, one
running the server and one loading a URL it serves via curl.
In your Edstem workspace, make a new file called SearchEngine.java. In it, implement a web server (like
NumberServer.java) that tracks a list of strings. It should support a path for
adding a new string to the list, and a path for querying the list of strings
and returning a list of all strings that have a given substring.
Examples of paths/queries:
/add?s=anewstringtoadd

/add?s=pineapple

/add?s=apple

/search?s=app
(would return pineapple and apple)
Discuss with your partner how you plan to add a new string to the list, query for it, and return a list of all strings with the given substring (as described above).
When you've implemented this (and even if you don't finish), make a note of the path for the code; we will use it and improve on it in future
labs.
Write down in notes – When you have something you want to share for your
search server, share the machine and port with others and try out one another's
servers! Can you have one person add some words that another person searches
for? As accurately as possible, describe where each list of strings is stored.
As usual, we publish these ahead of time, but they aren't guaranteed to be final
until the start of lab on Monday.
This week in lab, you will set up the terminal in an environment called Visual
Studio Code on your own computer (or on a lab computer in your course account),
and you'll complete the first Skill Demonstration.
(If you can't or don't want to use your own computer for this for any reason,
you can do the installation of VScode on one of the computers in the lab! You
can do all your work on the lab computers all quarter, no personal laptop setup
required.)
Go to the Visual Studio Code website
https://code.visualstudio.com/, and follow the
instructions to download and install it on your computer. There are versions for
all the major operating systems, like macOS (for Macs) and Windows (for PCs).
When it is installed, you should be able to open a window that looks like this
(it might have different colors, or a different menu bar, depending on your
system and settings):
Write down in notes: Everyone should share a screenshot of VScode open –
help folks figure it out if it won't install. If someone gets stuck, take a
screenshot of the error message or point at which they are stuck so we can help
them figure it out later, and they can decide to keep trying (potentially with
the tutor helping) or move on.
Then if you're on Windows: install git for Windows, which comes with some
useful tools we need:
(That's all the special instructions for Windows users). Then, to run commands,
open a terminal in VScode. (Ctrl or Command + `, or use the Terminal → New
Terminal menu option). Try running some of the commands we learned in earlier
labs and lectures on this computer.
Write down in notes:
What was the working directory of the terminal that opened in Visual Studio Code?
What is your home directory on this computer?
What files and folders are in the home directory?
Where do you think files that download from your web browser go? Can you list
them with ls? What's the absolute path to that folder?
Do any commands work differently than you expect on this computer?
Are you able to use ssh with your username and password
from the terminal in VScode to log into ieng6 and enter the course-specific account? Refer to lab
2 to recall the commands you used.
Take a few screenshots of what you tried, and discuss how this environment
differs from EdStem.
Once you run java and the server starts, you can open up a browser on your
computer and visit http://localhost:4000 (assuming you chose 4000 as the
port when you started the server).
If the java command isn't found when you try this, you should install
Java.
There are a few definitions worth discussing here for introducing/reminding you
of a few concepts:
Ports: The 4000 above identifies a specific port that the web server runs on.
This is an extra part of a URL that’s often used in development; 4000 isn’t
special and you could pick others – you’re welcome to try a few in the
thousands; it won’t break anything. Sites on the public web actually use a port
as well, either 80 or 443, but your browser hides it from you because it’s the
default. You’re welcome to read about these details, but they aren’t necessary
to learn the relevant stuff in this lab.
Localhost: The localhost domain refers to the computer you’re on. So rather
than going out over the internet to send the URL to a particular domain
somewhere else, this page is being handled by the running Java program on your
computer, which we say is “listening” on localhost at port 4000. That work is
what’s done in Server.java and by Java’s HTTPServer library.
Write down in notes: Show a screenshot of the server running on your computer.
For this part of the lab, you will be completing your skill demo on a platform
called PrairieTest. Your TA will show how to
schedule your exam and use the workspace for the skill demo. We recommend using
Google Chrome. This isn't because Joe particularly likes that browser (he
doesn't), but because that's what's installed on the department computers
you'll do the later skill demos on.
Note: The remaining skill demos (on weeks 5, 7, and 9) will be different from
this week! You will be required to use the lab computers and will schedule your
skill demo separately for a time outside of your lab section. You will be
allowed to use notes and other resources only on a personal device. If you
would like to practice using the lab computers, we recommend trying out the
skill demo today on a lab computer. On future skill demos, you cannot
communicate with other students and will have a time limit as well.
Once you are done with your own skill demo, you can help out your group members
complete the skill demo too! If all members of your group are done with the
skill demo, you may begin with the lab tasks.
With the setup we've used so far this quarter, each time you log in to your
course-specific account, you have to type the password. You might have noticed
that during the skill demonstration you didn't have to type the password for our
instructor accounts! Here, you'll learn how to configure that for yourself (it
will save lots of time).
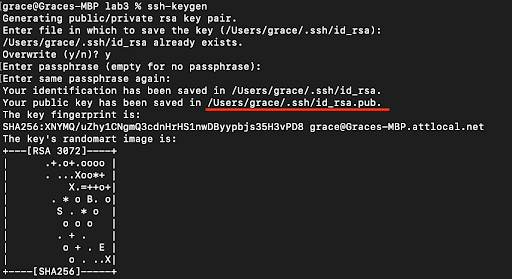
In your local terminal (the one you opened in VSCode), run ssh-keygen
Keep entering <Enter> until the program shows some text it calls the "randomart image".
Note the path where the public key is saved (underlined below).
Now, log into your remote course specific account on ieng6 with ssh
(using your password as usual)
Run mkdir .ssh in the terminal
Log out of your remote account
Now, we want to copy the public SSH key you created onto your remote account,
specifically inside the .ssh directory you just created, in a file called
authorized_keys.
Scroll up a bit to where you were creating the SSH key, find the line where it
says: Your public key has been saved in: <path to your public SSH key>, copy
the path. Make sure you get the public key file, ending in .pub, here, not
the private file.
From your local computer, run scp <path to your public SSH key> user@ieng6.ucsd.edu:~/.ssh/authorized_keys (make sure to fill in your actual username)
Enter password when prompted (this will be the last time you have to type it!)
Try to log onto your remote account again, you shouldn’t be prompted for a
password anymore. If you are, ask for help and carefully review the steps above
with your partner.
Write down in notes: This part introduced two new commands: scp and
mkdir. Describe what you think they do in notes.
Then, look them up online. You can do a Google or similar search for scp command and mkdir command. What do you learn about them?
Then, look them up using the man (short for “manual”) command. Run man scp and man mkdir from the command line. What do you learn about them?
You'll be introduced to new commands all the time; a course like CSE15L can't
cover them all in 10 weeks!
On future labs and assignments, you can choose whether to start from EdStem or
from Visual Studio Code on your own setup.
Write a web server called ChatServer that supports the path and behavior
described below. It should keep track of a single string that gets added to by
incoming requests. The requests should look like this:
/add-message?s=<string>&user=<string>
The effect of this request is to concatenate the string given after user=, a
colon (:), and then the string after s, a newline (\n), and then respond
with the entire string so far. That is, it adds a chat message of the form
<user>: <message>
So, for example, after
/add-message?s=Hello&user=jpolitz
The page should show
jpolitz: Hello
and after
/add-message?s=How are you&user=yash
the page should show
jpolitz: Hello
yash: How are you
(Some browsers might show this as How%20are%20you with a special character
replacing the spaces; don't worry about fixing that for this example. If you
want to look it up it has to do with URL encoding, a topic we won't address
right now.)
You can assume that the s= parameter always comes before the user=
parameter, and they are always separated by a & as shown above.
Show the code for your ChatServer, and two screenshots of using /add-message.
For each of the two screenshots, describe:
Which methods in your code are called?
What are the relevant arguments to those methods, and the values of any
relevant fields of the class?
How do the values of any relevant fields of the class change from this
specific request? If no values got changed, explain why.
By values, we mean specific Strings, ints, URIs, and so on. "abc" is a
value, 456 is a value, new URI("http://...") is a value, and so on.)
Using the command line, show with ls and take screenshots of:
The absolute path to the private key for your SSH key for logging into
ieng6 (on your computer, an EdStem workspace, or on the home directory of
the lab computer)
The absolute path to the public key for your SSH key for logging into
ieng6 (this is the one you copied to your account on ieng6, so it should
be a path on ieng6's file system)
A terminal interaction where you log into your ieng6 account without
being asked for a password.
If you don't have Java already installed, go ahead and download
the latest Java JDK version from this Oracle link.
Download the version that has "Installer" in the file name for your specific device (Linux, macOS, Windows).
There are many ways to download the code from your repository and upload
changes. We will use Github Desktop to do this
today, and see other options in the future. Even if you have some other
preferred way to do this that you've used before, please do follow the tutorial!
You may learn something new and useful.
Download the Desktop Client for Github. Install
it, and log in with your Github account. The startup page should look something
like this:
Then, you can get the code from your repository in one of several ways:
On the Github repository page, there is a <> Code button; you can click on that and
choose “Open with Github Desktop”
From Github Desktop, you can choose “Clone a Repository from the Internet” and
then choose your repository
To test it out, try cloning your lab reports repository. You'll see a message
about cloning, and then see this page:
In this screenshot, you'll see the red circled part where it says Open in Visual Studio Code, which is where you can open your code in VS Code to edit your files directly! One thing that I often find a little surprising about this page is that it
doesn't list any files – index.md is nowhere to be found here! This is because
Github Desktop (and the underlying tool, git) are all about tracking and
recording changes; we won't see much in this interface until we make some
edits or create some new files.
Today in lab, you'll clone another repository and work with it a bit, so
you'll see how this works.
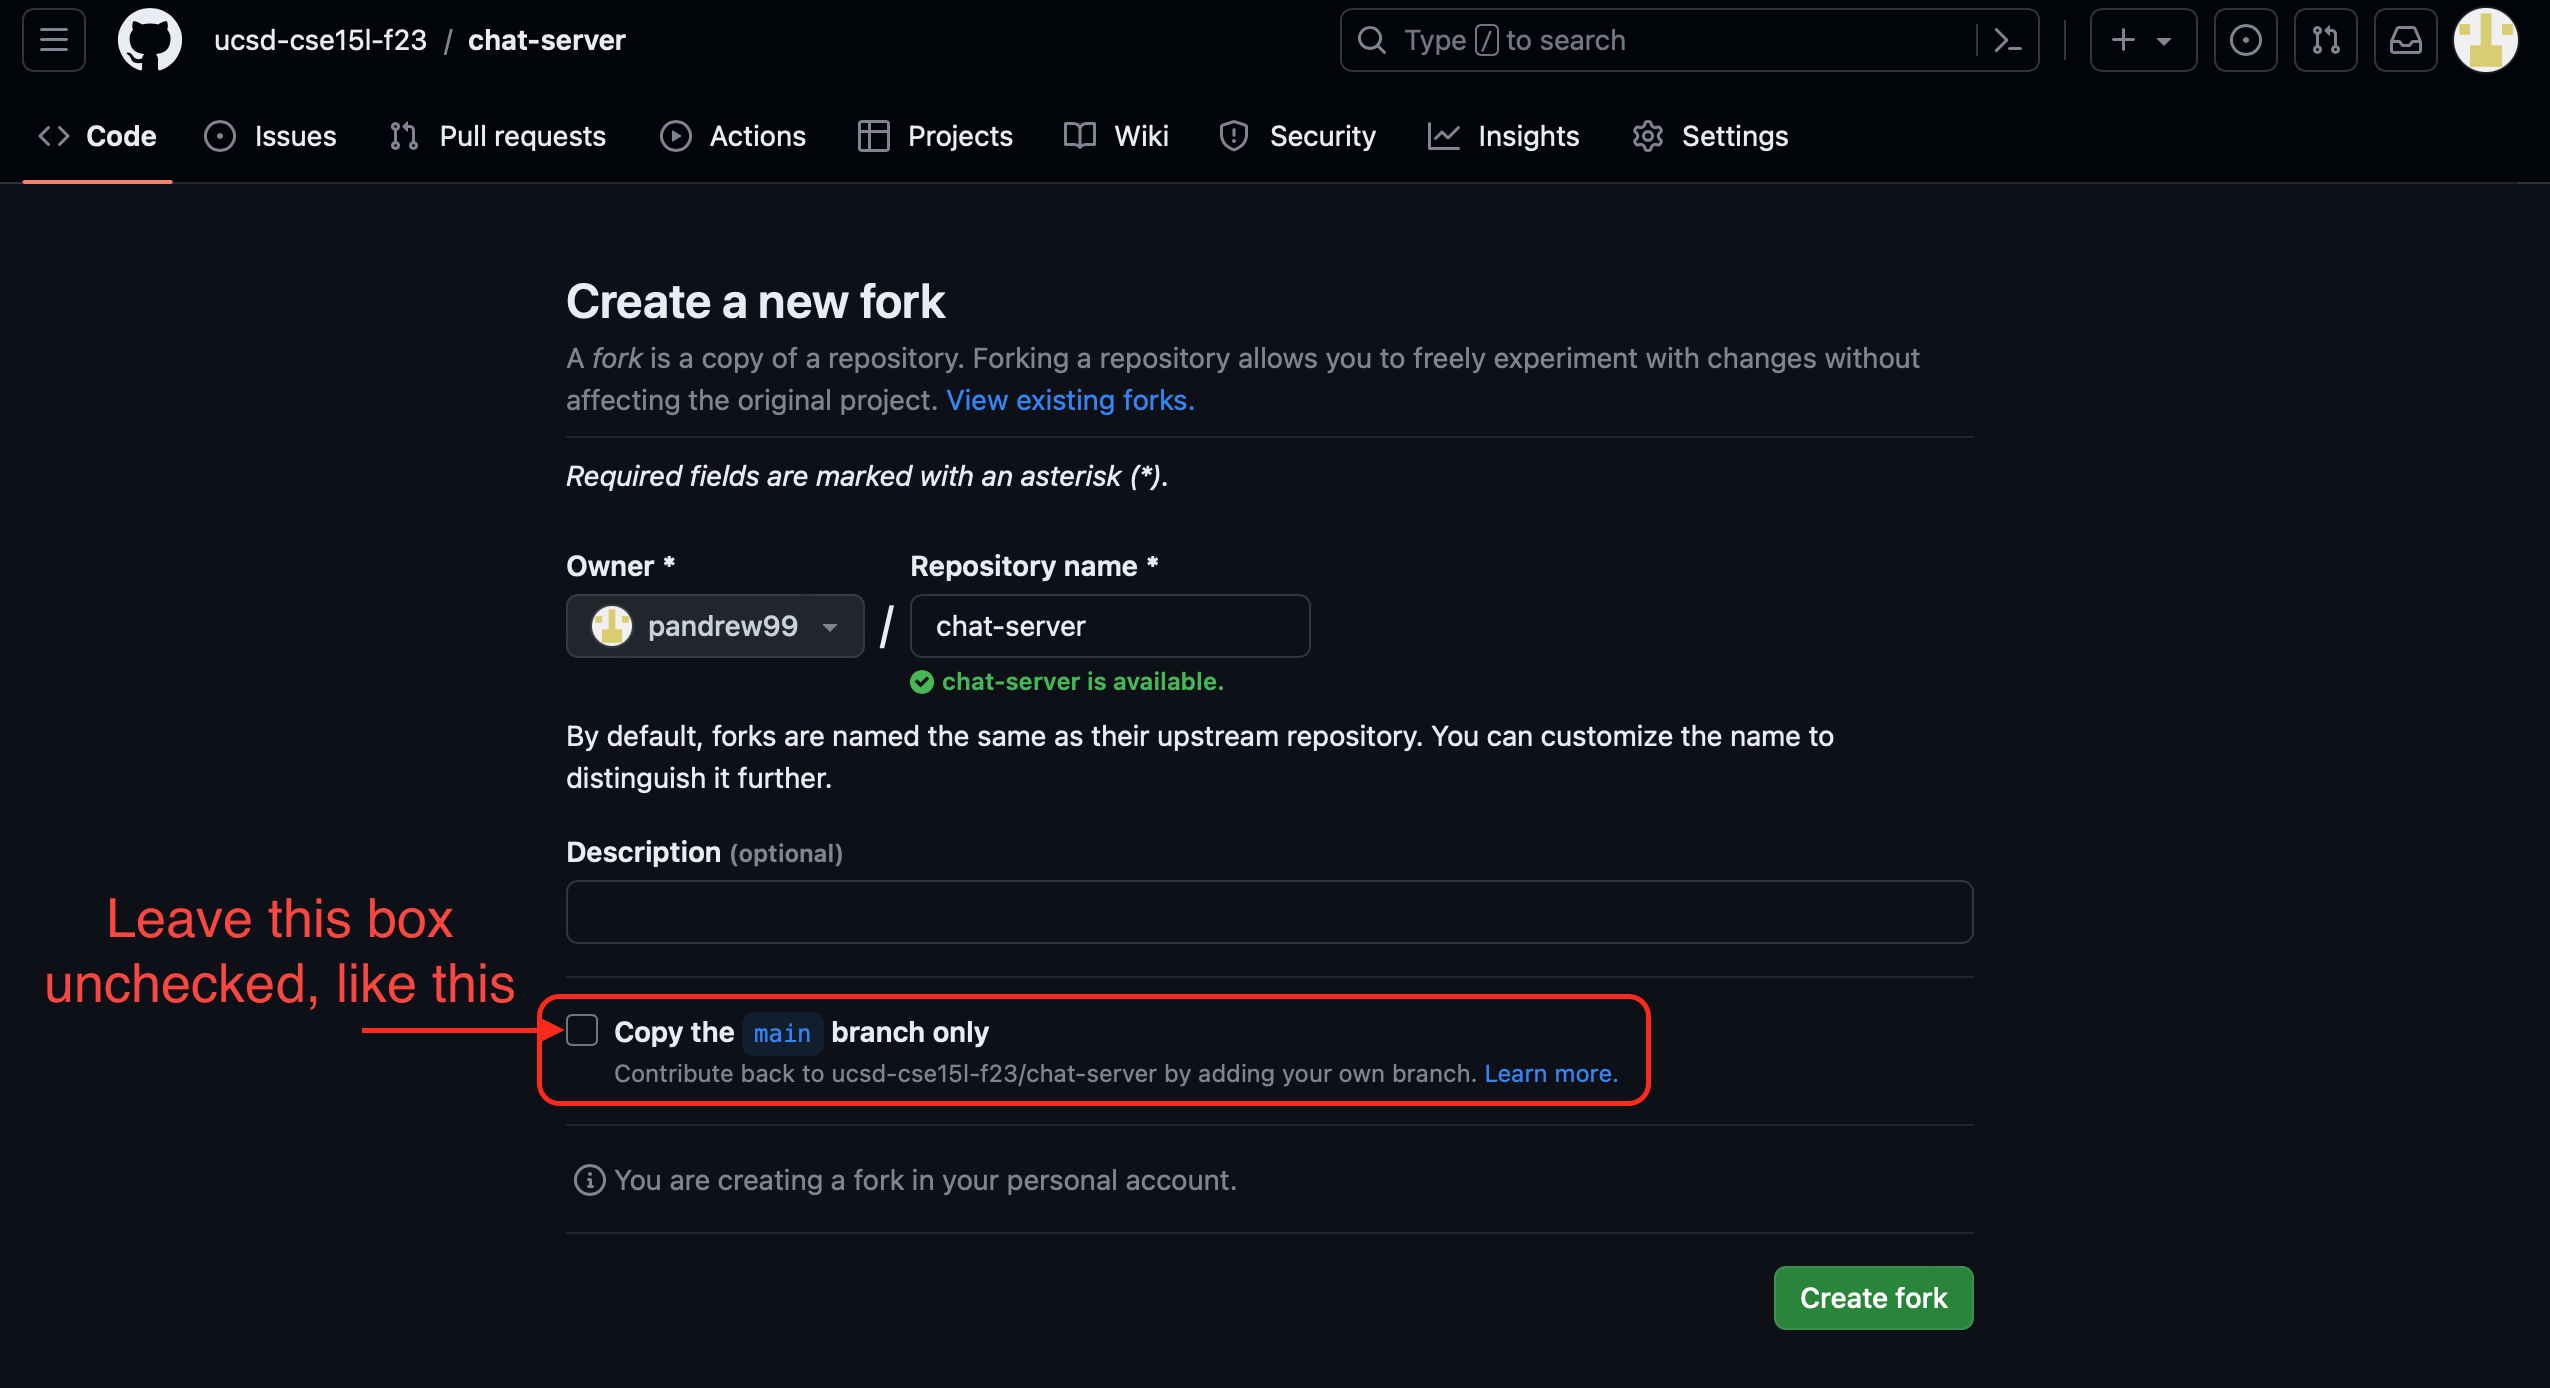
This makes a copy of the repository on in your Github account. Then, clone the
repository that you forked (not the original!) using Github Desktop, and open it
in Visual Studio Code.
Write down in notes - Find the exact location of the cloned repository in your computer's file system and write down the entire pathname. It is worthwhile to keep track of where cloned repos are located and to organize your computer.
There are a few relevant files for us:
ArrayExamples.java
ArrayTests.java
ListExamples.java
LinkedListExample.java
FileExample.java
The files that end in Example or Examples have code in them with bugs for
you to find – in ListExamples and ArrayExamples, all the methods have bugs.
In LinkedListExample at least one of the methods on LinkedList has a bug.
In FileExample, getFiles has a bug.
So many 🐛s!
The file ArrayTests.java has some tests for the methods in
ArrayExamples.java. It uses a library called
JUnit to run tests using methods called
assertEquals and assertArrayEquals and other assert... methods.
(Note: JUnit is already included in the repository so no need to install anything)
When we run this class with JUnit, it runs each method that has a @Test annotation on
it, and reports the success or failure of the assert calls.
Since JUnit is an external library, it requires some extra work to compile and
run. These two commands work well, and you should see output like the below when
you run them:
MAC USERS:
local $ javac -cp .:lib/hamcrest-core-1.3.jar:lib/junit-4.13.2.jar *.java
local $ java -cp .:lib/hamcrest-core-1.3.jar:lib/junit-4.13.2.jar org.junit.runner.JUnitCore ArrayTests
JUnit version 4.13.2
..
Time: 0.006

OK (2 tests)
WINDOWS USERS:
local $ javac -cp ".;lib/hamcrest-core-1.3.jar;lib/junit-4.13.2.jar" *.java
local $ java -cp ".;lib/junit-4.13.2.jar;lib/hamcrest-core-1.3.jar" org.junit.runner.JUnitCore ArrayTests
..
Time: 0.006

OK (2 tests)
The * in the first command tells javac to compile all the .java files
in this directory. It's a shorthand for writing them all out, so it's a useful
notation to start using now whenever we have several Java files to compile.
The -cp command-line argument stands for "classpath". Java uses this
command-line argument to know where to look for classes. It takes paths
separated by : / ; (dependent on your operating system), so the first place it will look is ., the current directory.
After that, it will look for classes in the two .jar files in the lib
directory. A .jar file is like a .zip file of a bunch of classes, and Java
knows how to work with them.
While you might think the .. in the output below JUnit has something to do
with a path, it's actually printing a . for each test that runs. So if you run
hundreds of tests, you can kinda watch the progress by seeing how the dots count
up.
Task with your group: Try running the command of the operating system that isn't
yours. (For example, a MAC user trying the Windows command and vise-versa) Observe the
output and discuss with your partner/group what happens and why?
The two tests we wrote for you in ArrayTests.java pass, but the two implementations of reverse methods in ArrayExamples.java have bugs! Write more tests in ArrayTests.java to demonstrate that the two methods, reverseInPlace and reversed, have bugs, and identify the bugs.
Write down in notes - For each, what was the failure-inducing input (the
test)? What was the symptom (the output when the test failed)? What was the bug
(the problem in the code)? Be as specific as possible when adding the following down to your notes:
The code for your tests (copy it into the doc)
The output corresponding to each symptom
The code change you need to make to fix the bug
Checkpoint – After fixing the reverse methods, we want to save these changes to our Github repo. It's really useful to checkpoint your work this way; you will
be able to see in the commit history every time you make a change and commit.
In order for these changes to appear on GitHub, we need to commit and push them. Open your GitHub Desktop window, and it should show that you have made a change in the lab3 respository as seen in the image below (which shows the wavelet repo but it should look similar). Click the button shown at the bottom left that says Commit to main.
Next, for the changes to actually appear on GitHub, you need to push them. GitHub Desktop should now display a new screen. Click the Push origin button displayed in the screenshot below.
Now your changes to this repository should be visible in GitHub!
You can see more documentation about git and pushing your changes here:
Next, for averageWithoutLowest, you will do a similar process as above, making sure to note symptoms, failure-inducing inputs, and bugs. But, this time, your lab partner will brainstorm one of the tests for you to write, describe it to you at a high level, and then you will implement it. Complete these steps as described below.
Write down in notes - Come up with a high level description of a test that your lab partner should implement (without using any code!). Also include: Which symptom/bug is this testing for? Why is this test useful?
Implement and run the test devised by your lab partner
If you're having trouble thinking of tests, try starting from the smallest
possible inputs (an empty array), and then trying increasing sizes of arrays to
structure your thinking.
There are two methods in ListExamples, each of which has a bug. For this
program, create a new file called ListTests.java with JUnit tests. In ListTests.java, write some tests to identify and demonstrate the bugs in ListExamples. You should carefully design your tests to get failing inputs, symptoms,
and eventually identify the bugs. Keep in mind that most of the time we can find
relatively small inputs that trigger the symptom!
Checkpoint – Commit and push your changes, and don't forget to add the new file! This
is one of the most common mistakes I make with git that is annoying for my
collaborators: I add a new file locally and forget to put it on Github for them
to see!
The file LinkedListExample.java has an implementation of a linked list that
is, in fact, buggy. We won't tell you which method(s) have the bugs. Create a
file called LinkedListTests.java and write tests in that file.
Note that for this case, your failure-inducing input requires a little more work
to construct: you have to build lists and try out the methods. All of that work
is part of the “failure-inducing input”, and it's useful to have it all written
down in code so that we don't have to remember it or re-type it each time we
want to run the test.
Write down in notes – Symptoms, inputs, and bugs.
Checkpoint – Commit and push your changes, and don't forget to add the new file! This
is one of the most common mistakes I make with git that is annoying for my
collaborators: I add a new file locally and forget to put it on Github for them
to see! This is repeated from last week.
Reflect, write down in notes – You've now had to create two new test files
(one for ListExamples and one for LinkedListExample). What actions did you take in
your editor to do this? How long did it take you? Could you or did you use
copy/paste effectively to avoid lots of typing? Could you or did you use the up
arrow in the terminal to “get back” earlier commands rather than typing them out
again? Any other tricks you could use to make this more painless in the future?
Discuss with your group! The long-term goal here is to learn tips and tricks to
take tasks that might be annoying 5-minute tasks and turn them into 30-second
tasks. It really changes how you think about writing tests if the process of
getting started takes less time!
The file FileExample.java has an implementation of a method that works with
the filesystem and, fortunately for our learning, it's buggy.
This one is interesting because the definition of a "failure-inducing input" is
trickier – this program won't run without us having some files and paths
available to try! There is a comment in FileExample.java showing an example file structure for this program. So the first thing you may want to do is create the file structure depicted in the comment in your repository! Then you can
write tests that use FileExample.java. You can create this just using VScode's "new
file" and "new folder" buttons/options.
To help you read and understand the program check out the File documentation here:
Write down in notes – Symptoms, inputs, and bugs. Remember that your input
is not just the code, but also the test files you created.
Checkpoint – Commit and push your changes, and don't forget to add the new files,
including the files you created as test input! All these files need to be a part
of the repository so that we can run the tests. (This is a particularly annoying
one to realize you missed later – the test will fail because the input data
doesn't exist!)
Discuss – Out of all the bugs above, which was the most interesting bug you
found? Have you ever made bugs like these yourself in your own programs? What
about having JUnit tests written might be useful one or two weeks from now?
Let's test your knowledge of bugs and how to troubleshoot them!
You and your partner should design a bug that you think is not trivial to
catch. Make sure you agree on what a failure-inducing input for it is. This
could be a new method you make up, or an edit to one of the existing methods in
the lab already.
Write down in notes - Then, with another pair who has also done this, swap
the buggy programs you designed (you can copy-paste them into the notes doc to
share). See if you can spot one another's bugs, and catch them with a
well-designed input. Were these easy or hard to catch?
Once both groups have found the issues, try again! Try to stump one another with
plausible, but tough-to-find, bugs.
Share your favorites with your team and tutor. We'll share a few of the best
ones in class.
The technical/ directory is a sample of writing in English from
https://anc.org/data/oanc/download/, a
free and open corpus of English text samples. We'll use it as sample data to
explore how to search through files. We'll do two main tasks:
Answer several questions about the dataset by using command-line tools and
bash scripts
Write a web server that can respond to queries for files within this
directory
In this section we'll use a few different command-line tools to build scripts
that can answer interesting questions about these text files – they'd work on
any directories containing plain text files! We'll also generally get practice
with using tools purely from the command-line.
First question: How many text files (files ending in .txt) are there? We'll
walk through this together.
First, let's try the find command. find will take a directory path as an
argument and list files and directories inside that directory. Try using
find technical/
What do you see? (If your local computer is Windows, make sure you have a
bash terminal open!)
That's a lot of files, and all that output kind of takes over the terminal!
One really useful thing we can do with any command is use output
redirection to put whatever would be printed into a file. Then we can process
that file with other commands. The > character does output redirection in
bash. Try:
find technical/ > find-results.txt
What do you see? Nothing, right? Do ls and you'll see that find-results.txt
has been created in the current directory. You can use cat on it and see the
long listing of all the files and directories.
Sometimes we want to explore a file at the command line (because we're on the
remote), and we don't want the long output from cat. Another command, called
less, is really good for this. Try:
less find-results.txt
This will “take over” your terminal with just the first screenful of lines. You
can press q to exit out of less and get back to the normal terminal (try it,
then restart less). You can scroll up and down using the up and down arrows,
and go down by a screen at a time by using the space bar. less is a great way
to quickly check the contents of a file when you don't have a convenient visual
editor (like VScode) to use to explore it.
OK, so we can confirm that this file that we've made find-results.txt, has a
bunch of lines and each line is a path. Let's get back to our question:
How many text files are there?
There are a few ways we could do this. Since we'd (eventually) like an answer
that works in a script, it would be useful to find a command that does this,
rather than, say, counting them by hand or using the line number in a text
editor. That leads us to introduce one more command, wc, which stands for
“word count”. wc takes a path and prints out some information about that file.
Try this:
wc find-results.txt
You'll see output that looks something like this:
1402 1402 54468 find-results.txt
The first is the number of lines in the file. The second is the number of
words (wc uses a pretty simple definition of words – strings separated by
whitespace; since the paths don't have spaces, each counts as one word). The
third is the number of characters in the file.
Since there's one line per path, it seems like 1402 is our answer. We used a few
commands and concepts to get here:
find «directory-path», which searches (recursively) in a directory for files
and lists them all
less «file-path», which helps explore files from the command line
wc «file-path», which counts words in a file
«any-command» > «a-file», which isn't a command, but we can put after a
command to redirect its output to a file
Write down in notes: Show screenshots of using the above commands to get to
this answer. Are you sure it's the right answer? How do you know? Can you see
anything that might be inconsistent about that answer when you use less?
Turns out this answer (1402) is wrong. You might say it's only a little bit
wrong, but it's still not right! It's wrong because find includes all of the
directory names as well as the file names. (It would also be wrong if there
were non-.txt files in the directory structure – are there any?)
There are a lot of ways we can do this—I encourage you to do a web search for
the -name and -type options for find—we will use it as an excuse to
introduce one more really cool command: grep.
At its simplest, grep takes a string and a file, and prints out all the lines
in that file that match the string. Try:
grep ".txt" find-results.txt
Then, let's store the results in a file so we can work with them:
grep ".txt" find-results.txt > grep-results.txt
The, use wc to check the line count in this new file (you try that yourself!)
Write down in notes: What's the actual count of .txt files?
That's a lot of exploration at the terminal! It's useful to also consider how to
turn this into a script that prints the answers. Let's see what that might
look like. We can put the commands in a row in a file called count-txts.sh:
Write down in notes: Show putting this into a script and running it to get
this answer.
Sometimes it's useful to parameterize a script with command line arguments.
Make it so this script takes the name of the directory to traverse as the first
command-line argument, so you use it like this instead:
bash count-txts.sh technical
Then, use it to count the number of files in some of the subdirectories like
biomed and plos.
Write down in notes: How many files are in those directories?
Write down in notes: What happens to the find-results.txt and
grep-results.txt files when you run the script? What are some consequences of
that for where you should be careful when using output redirection?
Here's another question that would be nice to answer: How many total words
are in the files in technical/biomed?
For this, it would be nice to be able to use wc on all the files in that
directory. wc can take multiple filenames. For example, we could give two
paths, and wc will tell us the number of lines, words, and characters in each:
Here we have our answer – 3437323. That's a lot of words!
Write down in notes: How many total words are in technical/plos? How many
total characters?
Another related question we might want to answer is which file in
technical/biomend has the most lines? If wc reported the files' counts in
order, we could simply read off the first or last one. But we can see in the
output above that there is no particular ordering relative to line, word, or
character counts in the output.
There's another command that's great for many situations like this: sort.
That's right – there's a sorting command built-in! sort takes a file and
prints out the lines in that file in sorted string order. The way wc is
designed, this ends up exactly matching a sort based on line number!
The last file output has 2359 lines, and it's
technical/biomed/1471-2105-3-2.txt.
Write down in notes: What is the article in that file about?
Write down in notes: Answer the following questions using grep, find,
** patterns, > redirection, wc, and sort:
What is the file with the fewest words in technical/plos? What are the
first few lines of that file? (Hint: the line count comes first. You can make
wc report just the word count with the -w option)
What is the file with the most characters in either technical/plos or
technical/biomed? What are the first few lines of that file? (Hint: try the
-c option to wc)
How many lines in technical/plos contain the string "base pair"? What
about in technical/biomed? (Hint: look up the -r option to grep)
How many files in technical/plos contain the string "base pair"? What
about in technical/biomed? (Hint: look up the -l option to grep)
Copy the commands you used to get these answers along with the answers
themselves! You can make scripts out of them (especially if they needed multiple
commands).
Discuss: What other interesting questions can you answer with what you know?
The repository also has a file DocSearchServer.java, which has a (fixed)
version of getFiles from last week's lab, and a server that uses it.
Add start.sh and test.sh scripts as we did in lecture, and make sure they
start the server and run the tests, respectively.
Start the server and check that the following URL paths have the described
behavior:
/ prints "There are NNNN files to search" where NNNN is the total number of
files returned by getFiles
/search?q=search-term prints "There were NNNN files found:" and then a list
of all the paths of files that contain that search term. For example, if the
search term is base pair it should print the same paths you found in your
search above.
Add a few tests that give meaningful search results (you can use some of the
ideas from using grep above), and take some screenshots of the working server
loaded from a browser.
Write down in notes: How long did it take you to make the scripts? Now that
you've made them how long does it take you to run the tests and start the
server? Was that an overall savings on your time? What if we run the tests and
server 100 more times this quarter, will it be worth it?
Push to Github: The scripts you added to your fork
Experiment: Add a new text file somewhere in technical with the contents
of your choice. Then, get the code and data onto ieng6 if you haven't already
(you could push and then git clone on the server). Start the server and have
our partner do a search that finds the file you added. Then do the same with
their server (they add a new file that you find). Where are those files stored?
What does that say about how the filesystem and paths work for searching for
these files?
Then, make an extension to the behavior of the server:
Accept queries of the form ?title='<some string>'. This should return all
the file paths where the given string is part of the path of the file
(including its file name)
Write two tests in the test file that use this query
Include a few screenshots demonstrating this query
Start your enhanced server on ieng6 and get someone else to try it out from
another computer
If you want a programming challenge, try making it so you can support
queries of the form title=str&q=str that check for both the title and the
file contents containing the respective strings.
What's a question you want to answer, but aren't sure how to answer about these
files with the commands you have? Maybe someone in your group or your lab tutor
would have good guesses! Or maybe.... ChatGPT would.
Come up with at least one idea that you don't know how to answer with the
commands you've seen so far. Ask ChatGPT to
help! You (or one of the members of your group) can make a free account by
logging in with Google.
We're not giving any examples here because we are all new to this technology.
We want you to experiment and teach each other (and us) what works and what
doesn't for you in using it to explore different command-line options.
The crucial thing here is that you should both try out and attempt to
explain the results from ChatGPT. As we saw in class, it's completely capable
of lying or giving inconsistent results. So we have to actually run the
commands to check that they're producing something reasonable (and maybe check
by hand that some of the answers are correct!)
You'll probably see new commands (ChatGPT doesn't know which commands we
learned this week), see new options and symbols, and so on. Try asking your
tutor, your group, Google, and ChatGPT for help understanding them. Write down
in your notes the prompts that worked especially well, and what you learned.
Write down in notes: At least 4 prompts you gave to ChatGPT where it
suggested command lines to try, with screenshots showing what happened when you
tried out those commands, and explanations of how they work. Don't just
copy-paste the explanation from ChatGPT if it gives one (we've seen those be
wrong in class, too!) – try to verify the explanation.
Consider the commands less, find, and grep. Choose one of them. Online,
find 4 interesting command-line options or alternate ways to use the command
you chose. To find information about the commands, a simple Web search like “find
command-line options” will probably give decent results. There is also a
built-in command on many systems called man (short for “manual”) that
displays information about commands; you can use man grep, for example, to
see a long listing of information about how grep works. Also consider asking
ChatGPT!
For example, we saw the -name option for find in class. For each
of those options, give 2 examples of using it on files and directories from
./technical. Show each example as a code block that shows the command and its
output, and write a sentence or two about what it’s doing and why it’s
useful.
That makes 8 total examples, all focused on a single command. There should be
two examples each for four different command-line options. Many commands like
these have pretty sophisticated behavior possible – it can take years to be
exposed to and learn all of the possible tricks and inner workings.
Along with each option/mode you show, cite your source for how you found out
about it as a URL or a description of where you found it. See the syllabus on Academic Integrity and how to
cite sources like ChatGPT for this class.
Write down your answers (and why you chose them!) in your group's shared doc.
In this week's lab you will write an automatic “grader” for some of the
methods we worked on in the week on testing.
In particular, you'll write a script and a test file that gives a score to the
functionality of a student-submitted ListExamples file and class (see
ListExamples.java).
The specific format is that you'll write a bash script that takes the URL of
a Github repository and prints out a grade:
$ bash grade.sh https://github.com/some-username/some-repo-name
... messages about points ...
This will work with a test file that you write in order to grade students'
work. You can use this repository to get started with your grader
implementation; you should make a fork:
As part of your work, you'll need to add new tests (or copy them from your
work on Week 4's repo called lab3) to the testing file, because the few tests that are there
aren't sufficient for grading. You can do that incrementally as you try out the
script you write below on different student submissions.
Do the work below in pairs—as a pair, you should produce one
implementation—push it to one member's fork of the starter Github repository
and include the link to that repository in your notes.
When your script gets a student submission it should produce either:
A grade message that says something about a score (maybe pass/fail, or maybe
a proportion of tests passed – your choice) if the tests run.
A useful feedback message that says what went wrong if for any reason the
tests couldn't be run (compile error, wrong file submitted, etc.)
A general workflow for your script could be:
Clone the repository of the student submission (you can find a list of submissions to test against here) to a well-known directory
name (provided in starter code) This is done by the git clone command in the
provided script
Check that the student code has the correct file submitted. If they didn't,
detect and give helpful feedback about it. This is not done by the provided
code, you should figure out where to add it
Useful tools here are if and -e/-f. You can use the exit command to
quit a bash script early. These are summarized in the week 4 Wednesday
lecture
handout
Get the student code, the .java file with the grading tests, and any other
files the script needs into the grading-area directory. The grading-area
directory is created for you, but you should move the files there.
Useful tools here might be cp (also look up the -r option to cp)
Compile your tests and the student's code from the appropriate directory
with the appropriate classpath commands (remember that if you're testing
locally on Windows, the classpath is
different). If the compilation fails, detect and
give helpful feedback about it. You should add this
Aside from the necessary javac, useful tools here are output redirection
and error codes ($?) along with if
This might be a time where you need to turn offset -e. Why?
Run the tests and report the grade based on the JUnit output. You should add this
Again output redirection will be useful, and also tools like grep could
be helpful here
Work incrementally – make sure you understand what the given code does. Then
add steps incrementally. After each step, run on a test student submission and
check for syntax errors, debug that step, add echo statements to check what's
stored in variables, and so on. Try running it more than once – is there any set
up or cleanup you need to do before or after running it?
Write down in notes: screenshots of what your grader does on each of the
sample student cases below.
After you're satisfied with the behavior on all of those submissions, write
your own. Try to come up with at least two examples:
One that is wrong but is likely to get full scores
One that is mostly correct but crashes the grader and doesn't give a nice
error back (and is likely to cause a Piazza/EdStem post saying “the grader
is broken!”)
You should create these as new, public Github repositories, so that you can
run them using the same grader script by providing the Github URL.
Write down in notes: Run everyone's newly-developed student submissions on
everyone's grader. That means each team should be running commands like
We've also provided our Server.java and a server we wrote for you called
GradeServer.java in the starter repository.
You can compile them and use
java GradeServer 4000
to run the server.
Look at the code to understand the expected path and parameters in
GradeServer.java. Loading a URL at the /grade path with one of the repos
above as the query parameter. What happens?
That's quite a bit of the way towards an autograder like Gradescope!
Write down in notes: Show a screenshot of the server running your
autograder in a browser.
Discuss and write down: What other features are needed to make this work
more like Gradescope's autograder? (Think about running for different students,
storing grades, presenting results, etc)
Congratulations! You've done one kind of the work that your TAs do when setting
up classes 🙂
Git (You don't necessarily have to install this on its own for your computer; but this is the link to the underlying tool called git. It's included in Github Desktop.)
This lab will be focused on doing all the tasks we've been doing so far solely
from the command line. That means using vim for editing and the git command
line tools for cloning and pushing.
Then, in pairs, you are going to write down exactly the keys to press to
make an edit to fix the test. You'll share these instructions in your shared lab
doc, and the next group is going to use them to try and replicate what you did.
So: Fix the program using what you learned about vim in the tutorial (as a
reminder, you're changing the index1 to index2 in ListExamples.java).
Re-run the tests to make sure it works. Keep extremely accurate track of
what you had to type to make this happen. You might even want to change the file
back to its initial state (u is the command for undo in vim) and
double-check that the instructions you are giving are good. When you're
satisfied, write down the list of keys that need to be pressed (including all
uses of Backspace, Enter, Escape, and so on!) in the shared notes doc. Have one
partner in your pair do this typing; the other partner shouldn't make the edits
yet because they will in the next step.
Then, go around the groups one at a time. The group to your left should use your
instructions to try and make the edit, then the next group to their left will
use their instructions, and so on. Watch carefully! Was each group able to? Why
or why not? Did the group typing do something that didn't match the
instructions, were the instructions not complete, or did something else happen?
Don't leave any mysteries!
You can press Ctrl (or Cmd)-Shift-p and start typing "screencast" to turn on
screencasting mode so others can see what you type.
Discuss and refine: After you do this, discuss how you could make the
process easier. Did you have to press the arrow keys a lot? Are there vim
commands that could have improved the process? How short of a key sequence can
you make it to perform this edit? Can you get it under 20 keypresses including
save and exit? Under 15?
If you finish quickly and want to practice more, each group can choose one
of the following tasks, and repeat this whole process (design the keys to press
in pairs, write them down in the notes, then go around and try the instructions
one pair at a time, with others looking on and observing).
In ListExamples.java, change the name of the sc parameter of
filter, and all of its uses, to instead be called checker.
In ListExamples.java, add a new line at the top of the first while loop in merge that prints out the current values of index1 and index2.
In ListExamplesTests.java, add a test for merge on two empty lists.
After watching the other groups do their work, can you think of any ways to
improve your instructions?
There are many things we can do to speed up working with the command line,
making it more efficient and easy to use. Working quickly can dramatically
change how difficult future programming tasks are for you, so it's worth
spending time getting better at using your tools.
In this lab, you’re going to learn how to make this process a lot easier for
you. Then, you will measure your improvement as you learn to complete the
command line tasks most efficiently. As you do this, check in with the people in
your group to see how they are doing things more or less efficiently than you,
and share tips.
In this section, you will be timing yourself while performing a set of tasks. The
tasks you will be performing will include forking a repository, cloning the fork
using the SSH url, running a set of JUnit tests to demonstrate that they fail,
fixing the bug using the vim editor and then re-running the tests.
Before we get to that though, there are few things that you will need to setup that will
help you save a lot of time!
You can access and write data in repositories on GitHub.com using SSH. When you
connect via SSH, you authenticate using a private key file on your local
machine, which in our case will be the ieng6 machine.
Create a private SSH key file on ieng6. This is a new private key just for
accessing Github from your course-specific account.
Login to ieng6 as usual (hopefully, without typing a password now!)
Run the command ssh-keygen, and again press Enter until the command completes and shows the "randomart image"
Next, we want to add the public key to your Github account. This is like
the step of copying the public key to authorized_keys on ieng6, but instead
we're copying to Github.
Display the SSH public key generated above to your clipboard using cat like
below; you can copy it by highlighting and right-clicking
cat <path of your ssh key .pub file>
Open your Github account on the browser.
In the upper right corner, click on your profile photo, then click Settings.
In the “Access” section of the sidebar, click SSH and GPG keys.
Click New SSH key or Add SSH key under the “SSH keys” section.
Add a “Title” to your key (ex: Your Name’s ieng6 machine).
Select the “Key Type” to be an Authentication Key
Copy your public key from the output of the cat command and paste it into the “Key” field
Click Add SSH key.
If prompted, confirm access to your account on Github.
Go back to the ieng6 terminal and:
Run the following command to add Github.com as a recognized host (this avoids
the scary yes/no prompt about accepting new connections the first time you
connect)
Check your connection by running the following command:
$ ssh -T git@github.com
It will say something like "Hi supercoolstudent1234! You've successfully authenticated, but GitHub does not provide shell access."
Now we have an SSH key which can be used to authenticate to GitHub! In addition to
using https clone URLs, we can now use SSH clone URLs that look like this:
Crucially, these will allow both cloning and pushing to the repository (as
long as your account has access). With this done, try cloning your fork of
the lab 7 repository (make a fork if you didn't already), then making a small
change, and pushing it with the command line.
Important: For the rest of the lab, make sure to clone using the SSH clone URLs as described above!
If you're not sure how to add, commit, and push from the command line, refer to
this past lecture video.
Make sure you can make a change to your repository by editing, adding, and
pushing all from the command line before going on!
First, we'll take a baseline measurement of performing the tasks above by timing
yourself. Your phone may have a timer app, or you can find one by searching for
online timers. The steps from above are duplicated here:
Setup Delete any existing forks of the repository you have on your account
Clone your fork of the repository from your Github account (using the SSH URL)
Run the tests, demonstrating that they fail
Edit the code file to fix the failing test
Run the tests, demonstrating that they now succeed
Commit and push the resulting change to your Github account (you can pick any commit message!)
Write down in notes: What was your baseline time? Did your lab partner have
a faster baseline than you? If so, do they have any tips to help you get
started on boosting your efficiency?
Now, you will explore various ways that you can speed up your work. Try all the
steps below, and find out what works best (and what doesn’t work) for you!
Using Bash History (up/down arrows)
You can use the “up” and “down” arrows to go through the history of
commands you have executed, it makes executing the same command much easier!
If you run the commands you care about, then log out and back in, they are
still in the command history!
You can use Ctrl-R to search your command history. At the bash prompt,
type Ctrl-R and then start typing part of a command – what shows up?
Experiment with using Ctrl-R
Using Tab
You can use the Tab key to speed up typing commands in the command line in
the following ways:
Start typing the first few letters of a command or path. Pressing tab
once will autofill the rest of the line up to the point where there are
multiple potential possibilities. If you press tab a second time, it will
show you all of the possibilities for what it could autocomplete to.
For the lab report this week, reproduce the task from above on your own. For each
numbered step starting right after the timer (so steps 4-9), take a screenshot,
and write down exactly which keys you pressed to get to that step. For special
characters like <enter> or <tab>, write them in angle brackets with code
formatting. Then, summarize the commands you ran and what the effect of those
keypresses were.
For example, when you run the tests, you might want to use the up arrow or
Ctrl-R to access your bash history rather than typing in the full command with
classpath, etc. You might say something like this accompanying the screenshot
for running the tests:
Keys pressed:
<up><up><up><up><enter>, <up><up><up><up><enter>
The javac -cp .:lib/hamcrest-core-1.3.jar:lib/junit-4.13.2.jar *.java command
was 4 up in the search history, so I used up arrow to access it. Then the java -cp .:lib/hamcrest-core-1.3.jar:lib/junit-4.13.2.jar org.junit.runner.JUnitCore ... command was 4 up in the history, so I accessed
and ran it in the same way.
Add this lab report to your Github Pages site, and submit a PDF of it as usual.
Note that since you last saw ChatServer, our devs have added more functionality such as emoji handling and reading chat history from file and loading it into our ChatServer.
Let's now run our ChatServer by executing java ChatServer [port number] in the terminal, open a web browser, and then point it to:
http://ieng6-[number].ucsd.edu:[port number]
We should see a blank page. Let's now import one of our chat history files by running:
This will now load the chat history and make it available to our ChatServer. Go to the root directory:
http://ieng6-[number].ucsd.edu:[port number]/
You should now see the chat history you just loaded. Take a screenshot of your root output and add it to your lab doc. Discuss with your lab mates how this could have worked. Note: You are not expected to be able to breakdown or rewrite the ChatHistoryReader.java.
Once you see the messages, feel free to add another chat by visiting
to save the messages into a new file. You can see the new file saved under chathistory folder.
Now on your own, open the java test file by giving it as an argument to vim, i.e.
vim HandlerTests.java. Note there's nothing to fix here, but we would like you to browse through the test to see the changes we've made. The test should work - our devs worked overtime to fix these bugs! You've just done file handling entirely on ieng6 and didn't need VScode at all,
just a terminal! Take a screenshot of your test results and paste them into your document.
As a group, discuss and write in notes:
What were the names of the test functions within HandlerTests.java?
What were two things you thought were annoying about using vim? Be specific.
What were two things you thought were cool about using vim? Be specific.
Do this part as a group, while logged into someone's account on ieng6. Here we will look at a branch in our code that is currently in developement and a work in progress. You and your group have been tasked with testing and debugging the new beta branch. This new branch includes adding even more functionality to the ChatServer you just pulled, such as semantic analysis based on emoji's used.
Make sure you are in the chat-server-pro folder and run git branch to see the current branch we are in and git branch -a to list all available branches. Take a screenshot of these commands and add them to your shared lab doc.
Notice the presence of the week8-sprint branch which is only available remotely. We will want to checkout the new week8-sprint branch by running git checkout week8-sprint. Normally performing a git checkout will update your current repo to that branch, but to ensure that we have the latest updates, you can always run a fresh pull in order to update our files. Let's do that by running git pull and verify our branch by running another git branch. Go ahead and take a screenshot of these steps and add them to your document. Discuss with your group members and write a short summary of what you just did in steps 1-2.
Fun Fact: Sprint is a common Software Engineering technique used to complete project milestones.
Notice that we have an infinite loop where the terminal stuck at . This will eventually result to test failures.
Next, use jdb to run the JUnit tests. You can refer to the lecture videos for a good way to
do this. Again, use jdb commands to find:
The stack trace when the exception is happening
The local variables in index and analysis when the exception is happening
Now, diagnose and fix the bug so that all the tests pass. There will be 3 bugs that you will need to identify and fix. Note that you may need to add additional tests to unearth these bugs as the given tests may not exhibit them! After identifying one, discuss with your members how to fix it and copy and paste the code into code markdown with the fixes. Recompile and rerun your tests. What other bugs can you find? What variables should we be looking at instead of index and analysis? Should we still look at these variables or others? Find each bug and use jdb to step through your code.
Practice using jdb with suspend to pause the program and show the stack
trace during the loop. You should be able to identify:
Which test is triggering the infinite loop
Which line the program stopped on when the program was suspended
What the current values of all the variables are in /semantic-analysis at the
moment the program suspended
Take a screenshot or copy/paste of your jdb session and indicate in your notes
each of the three items above and how your jdb session informs you of that.
Make a commit with the fix and push it to Github. Paste the Github link to the commit in your notes. Recall from lecture the following terminal commands for adding files, commiting changes and pushing said changes:
git add
git commit
git push
Write down in notes:
What is information that you were able to get via jdb that you would be
unable to get via the stack trace of the exception?
What are some pros and cons of using jdb to get information vs. adding print
statements to do so?
Discuss the /semantic-analysis command – What emoji's are there? How are they being analyzed and how is the semantic implemented? How could these type of methods be useful for analyzing other chat histories?
Joe: Hey, did you hear about the Java developer who walked into a bar?
Edwin: No, what happened?
Joe: He said, "Give me a strong cup of Java! And make it Object-Oriented!" ☕️😄
Onat: Haha, that's a good one, Joe! Speaking of Java, did you know that Monty Python's Holy Grail was written in Java?
Edwin: Really? I thought it was written in Python!
Onat: Well, that would make more sense, wouldn't it? But it seems they had a "Java Holy Grail" moment! 🏆😂
Joe: And let's not forget the Java programmers who always have to deal with "NullPointerExceptions."
Edwin: Yeah, they're like the Knights Who Say "Null"! They're always on a quest to find that elusive object.
Onat: True, true! And when they finally find it, they shout, "Eureka!" just like Archimedes.
Joe: Haha, the life of a Java developer can be quite the adventure, just like a Monty Python sketch!
Edwin: Indeed! But at the end of the day, we all know that "The Spam of Java is not a valid beverage!" 🍖🚫☕️
Onat: Well said, Edwin! Let's keep the Java and Python jokes rolling, and help our student's code be as legendary as a Monty Python tale! 😄🐍👨💻
Onat: Hey guys, have do you know why the chicken crossed the road?

Edwin: Was it late to class?

Joe: To get to the other side?

Onat: No, to escape the Ministry of Silly Walks! 😄

Edwin: And did you hear about the lumberjack who wanted to be a dentist?

Onat: Nope, what happened?

Edwin: He got tired of the daily grind! 🌲😁

Joe: That's a good one, Edwin! But let me tell you about the time I tried to buy a shrubbery for my garden...

Onat: A shrubbery, you say? Did the Knights Who Say "Ni" give you a hard time?

Joe: They did! They demanded a sacrifice of... a herring! 🐟

Edwin: Well, that's not too bad. At least they didn't ask for a dead parrot. 🦜

Onat: Ah, the dead parrot sketch! I love how they could turn the most ordinary situations into comedy gold.

Joe: Absolutely! It's like their humor is a cross between a witty intellectual and a three-headed knight!

Joe: Agreed! Now, let's not be too silly and get back to work before we end up in a sketch ourselves. 😄
Joe: Hey, have you heard about the Java bug that's as elusive as the Force?
Edwin: No, tell me more!
Joe: Well, it's like a Jedi mind trick. It only appears when you're not looking for it! 🧙♂️
Onat: Haha, that sounds like a classic Java bug. But you know what's even more mysterious? Jar Jar Binks's role in Star Wars!
Edwin: Oh, Jar Jar... He's the real mystery of the galaxy. Maybe he's secretly a Java developer trying to fix bugs in the codebase.
Joe: Or perhaps he's a Sith Lord in disguise, using the Dark Side of the Force to cause those Java bugs!
Onat: That would explain a lot! "Meesa causing bugs, oopsie!" 😂
Edwin: And when you finally find a solution to a tricky Java bug, it's like saying, "These aren't the bugs you're looking for!"
Joe: Absolutely! You wave your hand and hope the bug disappears. But it usually doesn't work that way.
Onat: Well, as they say in the Java world, "May the stack trace be with you!" 🚀🌌
Edwin: Haha, that's the programmer's version of "May the Force be with you!" Let's hope we can teach our students to squash those Java bugs and keep the galaxy safe from code errors!
Joe: Agreed! And may our code be as strong as the Force itself. 🤖👾💻
For each snippet, add a test both to your implementation of
ChatServer that takes into account an emoji for each snippet and performs a semantic analysis. Run the tests and show
the results of running the tests on each on your lab doc. This means you should add a total of
3 test methods, one for each semantic analysis implementation.
Make as much progress as you can on your grading script from Week
6. Ask your lab tutor if you need help getting it
into a good state.
Don't worry about perfection; focus most on it being able to run and grade some
of the sample submissions.
When you're happy with it, have one partner make a new repository on Github
named grader-review-<username> where <username> is one of your usernames.
To do this, navigate to any GitHub page and click the + button in the top right corner, as seen on the screenshot below. A dropdown menu will appear, and you will click New repository.
From there, a page will pop up which allows you to set some attributes of your new repository. The only thing you need to change is the name, as seen in the following screenshot. You do not need to alter any other settings, and can press the green Create repository button at the bottom.
Now, we want this new repository to contain the version of your autograder that you want reviewed (This step
makes it so pull requests and issues will work in the last step later). To do that, you should navigate to your newly-created repository on GitHub.
Currently, it should be empty. You should see something like the screenshot below. We want to import your grading script code (which should exist in some other GitHub repo) into this repository. Click the Import code button circled in red below.
After clicking the above button, a page will pop up which asks you for "Your old repository's clone URL". Here, you will paste the HTTPS url of the GitHub repository which contains your grading script to-be-reviewed. Click the green Begin import button and wait for your code to be transferred over.
After the import is complete, navigate to the Settings page of this new repository and within the General page, under Features enable Issues
Before sharing, we should also make sure that it will work for others, and
doesn't only work on your machine! All too often it's easy to write programs
that run our own laptop, but when someone else clones our code, it doesn't work
on theirs. This leads to the dreaded it works on my machine:
We will standardize and say that all the graders should run on ieng6. So,
you should test your grader by logging into ieng6, cloning it, and running it
once there. If you get different behavior on a fresh clone on ieng6 than when
you previously tested it, figure out what happened! Your lab tutor can probably
help, a few common issues are:
Forgetting to add/commit a file (so someone who clones the repository doesn't
have it). Check that all the files you need are there on Github.
Having Windows-specific commands in a file that is then run on Mac/Linux.
Check that classspaths use : and not the Windows-specific ;
Having differently-formatted files. Windows actually uses different newline
characters than Linux by default. Check out this
article for
more on that issue.
Once you see the script run like you expect on ieng6, your grading script is
ready to be reviewed! Your lab tutor will manage assigning those submissions
between groups for review.
Your lab tutor will provide you with a link to a repository for another group.
Make a fork of it, clone it, and complete the following tasks. For each,
document it in your notes file:
Run their grader on all of the sample student submissions from week 6. How does their
output differ from yours? Do you think it's correct?
Try running their submission on any additional submissions you designed during
week 6. If you didn't do that during week 6, do it now – design a student
submission that you think will cause interesting behavior on the grader you're
reviewing.
Read all the code in their submission. Note down:
Things you liked about the code
Any lines of code you don't fully understand
If there were problems running the sample student submissions on their
grader, what a likely fix would be. Feel free to try making the fix yourself to
see if it would work!
New things you learned from reading their code
Suggestions for improving the code that don't change it's overall behavior,
just its style, readability, or performance
Write down all of this feedback in the notes file. You'll go over it with
the other group next. Think about how to give any feedback about issues politely
and professionally.
In all of this communication, remember to be polite, professional, and focus on
giving detail and clear writing. A huge part of the job of a working software
professional or researcher is accurately communicating about code and system
behavior, and doing so in a way that is about the system and not about any
specific person.
Some tricks for this: avoid statements that reference the author of the code,
frame negative feedback as possible improvements or ways your expectations were
violated, and take responsibility as the reviewer for anything you don't
understand.
Examples:
Don't say “You made a mistake here: ...” Instead say “On line 10 for this
sample student submission I expect the condition to be true but it's false
because XYZ.”
Don't say things like “It seems like you were rushing to finish...”. Instead
say “the script looks like it might be imcomplete – it works how I'd expect up
to line 22 and then doens't have any code to present the error messages”.
Don't say “It seems like you don't know about...”, instead say “On line 10-12,
these 3 lines could be shortened into one line using grep -r instead of find
followed by grep: ....”
Don't say “This code is slow...” Instead say “This grader took 10 seconds to
run for one submission. We think this is because... and if we change... it goes
down to 2 seconds.” If you think it's slow but don't know why, take
responsibility as the reviewer: “This grading script took 10 seconds which I
think is a long time. I can't figure out why, though.”
Don't say “This conditional is ugly:...” Instead say “I find it easier to read
these conditions when they are written as .... because ...” If you don't have a
good explanation to put after the “because”, how do you know it's a good
suggestion?
Don't say “You wrote lines 20-24 very confusingly.” Instead say “We had a lot
of trouble understanding lines 20-24. It would help us to work through an
example of how that part is supposed to work”
After you write this down, the lab leaders will help reorganize your groups so
you're talking to the group you reviewed (and who reviewed your code).
Go through the feedback you wrote down in the last step, and take notes on
clarifications and answers to questions you had.
Then, as appropriate, you should make issues and pull requests to one
another's repositories summarizing the feedback. Create these pull requests and
issues together with the other group, this will help everyone understand
what's written down.
Make an issue if there's a problem or improvement to make that you aren't
sure how to fix. Make sure to include the failure-inducing input, context, and
symptoms! They'll come back to this in a future week and need all that detail to
help understand and fix it. The Github instructions for making an issue are here:
Make a pull request if you have direct code update suggestions for the other
group. A pull request is a Github concept for sharing code edits with
others. To make a pull request, first make a fork of the repository you
want to submit the pull request to. Then, make the edits and commits you want to
make, and push them to your fork. Then the Github instructions for creating the
pull request are here:
Having an issue or pull request filed for your project is not a bad thing! In
the good cases, it means someone else out there in the world (or in your
company/institution) read your code, wants to help, and has something
constructive to say about it. Of course, you have control over the code, too, so
you don't have to accept their feedback as they wrote it. You can take it as
advice, ignore it, adapt it, put it off until later, and so on. But remember
that issues and pull requests are largely positive things – they are a sign that
your project has people paying attention to it, and they are a normal and common
part of managing a software system.
Design a debugging scenario, and write your report as a conversation on EdStem.
It should have:
The original post from a student with a screenshot showing a symptom and a
description of a guess at the bug/some sense of what the failure-inducing input
is. (Don't actually make the post! Just write the content that would go in such
a post)
A response from a TA asking a leading question or suggesting a command to try
(To be clear, you are mimicking a TA here.)
Another screenshot/terminal output showing what information the student got
from trying that, and a clear description of what the bug is.
At the end, all the information needed about the setup including:
The file & directory structure needed
The contents of each file before fixing the bug
The full command line (or lines) you ran to trigger the bug
A description of what to edit to fix the bug
You should actually set up and run the scenario from your screenshots. It should
involve at least a Java file and a bash script. Describing the bug should
involve reading some output at the terminal resulting from running one or more
commands. Design an error that produces more interesting output than a single
message about a syntax or unbound identifier error – showcase some interesting
wrong behavior! Feel free to set this up by cloning and breaking some existing
code like the grading script or code from class, or by designing something of
your own from scratch, etc.
In a couple of sentences, describe something you learned from your lab
experience in the second half of this quarter that you didn't know before. It
could be a technical topic we addressed specifically, something cool you found
out on your own building on labs, something you learned from a tutor or
classmate, and so on. It doesn't have to be specifically related to a lab
writeup, we just want to hear about cool things you learned!
In this lab, you'll be presented with a sequence of common debugging scenarios
that we have noticed students encountering this quarter. For each one, there's a
brief description and a screenshot. Your job is to reproduce the error shown
in the screenshot so that you see it on your own computer, and then describe the
fix.
For each of the scenarios below, you should:
Write down in notes: Discuss and confirm with your partner – what is the
desired or expected behavior, and which part of the output is wrong or
not what's expected?
Reproduce this behavior with your partner. If you have to, take the time to
write out exactly the command-line in a suitable repository. To reproduce, we mean
getting your terminal/editor to look as much like the one in the screenshot as
possible. It might not be possible to make it exactly the same—your username
will be different, for instance—but you should see the same error message for
the same command.
Write down in notes: Take a screenshot of your reproduction and put it in
the notes, along with a description of how you reproduced it (e.g. if you first
cloned a repository, opened a terminal, and changed directory, for example).
Write down in notes: Describe how to change the commands or program to get
the expected output. This might take some time and thinking! Did you need to
gather any more information to figure out the issue? What helped you figure out
the issue in the end? If you had a tutor or someone else help, what suggestions
did they make to lead you to the answer?
Write down in notes: Have you ever made this mistake before? What was easy
or hard about noticing the error? What could you do in the future to notice or
fix it more quickly?
(This is good practice and gives some understanding about what we do as course
staff when we see your EdStem posts!)
One skill we're practicing here is reproducing bugs. In general when
reporting issues or asking questions, there's a question of
reproducibility: whoever is seeing the error usually doesn't have
access to your running system, so reproducing the possible error from the
given information is a key step. Sometimes screenshots are more helpful than
just text, because they include the Visual Studio Code file browser or other
similar visual details. Sometimes text is more helpful than a screenshot,
because it can be easily copy-pasted to try out some code on another computer.
You can always provide both to really help the person trying to reproduce the
error, which is what we do in some cases below!
Here's a screenshot of an error (right-click and "Open Image in New Tab" to see
it if it's too small). For reference, this one was using the lab 3 code
repository. The programmer was trying
to run the tests.
Imagine you are a tutor or TA and you only have access to the screenshot below, but
not all the code. What would be frustrating about helping someone identify the
bug in this scenario?
import java.io.File;

public class Code {
   public static void main(String[] args) {
       File file = new File(args[0]);
       if (file.exists()) {
           System.out.println("File exists, yay!");
       }
       else {
           System.out.println("The file does not exist :(");
       }
   }
}
Then this surprising result happens (the programmer was expecting the file to
be reported as existing):
It's useful to reflect on what we've learned. (Seriously, it helps with the
learning process to do reflection.)
Think about what you've learned in labs, lecture, and quizzes this quarter.
Think about a question or a problem that you can answer now that you would not
have been able to at the begining of the quarter. Write it down in the notes.
Then, the other people in your group will try to answer it or talk about how
they would go about solving the problem using things they learned in class. Did
they have the same answer as you? Did they highlight any different parts of
their learning?
The best learning here will come from questions that aren't one-line answers
(“how do you git push from the command line” won't be a useful reflection, for
instance). A task you can imagine doing with a few lines of a bash script, a
strategy for debugging or choosing good test cases, a workflow for setting up a
project, a choice of Java feature for a particular program, and more could be
good examples of things to discuss.
Spend the remainder of the time discussing general computing/CSE
department/course/research topics with your group and tutor.
Write down in notes before starting the questioning out loud (tutors, don't
answer questions until folks have a chance to think and write!) What is a
question you have for your tutor/lab TA/classmates? Some potential conversation
starters are below, but don't be limited to these:
What classes are you taking?
Are you involved in any student organizations?
Have you done an internship recently?
What topics from CSE15L come up again and again in your courses?
Are you involved in research?
What has been your favorite/least favorite course at UCSD?
Once you've spent a few minutes thinking and writing something down, start
asking! Feel free to mix groups, listen in on other conversations, move around
the room, and ask these questions to the lead TA, too!